
Brought to you by the team at Bento Bio on the mission to make DNA lab work accessible to all. We create powerful, easy-to-use devices, affordable supplies, and guides, to help anyone—from beginners to professionals—harness the power of PCR anywhere.
In this article we discuss how to recognise non-specific amplification, its causes, and describe some solutions that you can try to prevent it happening. We also cover some gel artefacts of similar appearance, such as DNA being stuck in wells and associated smears.
This article is intended to provide an overview, examples, and quick lookup tables for troubleshooting, for complete beginners and experienced users alike.
By the end of the article you will have learned or refreshed your knowledge of:
- What non-specific amplification is
- The main types of non-specific amplification
- Why non-specific amplification occurs
- How to reduce the chances of non-specific amplification occurring
Background to Non-Specific Amplification
Non-specific amplification is the amplification of non-target DNA during PCR, as opposed to specific amplification of target DNA regions.
This definition does not include amplification of contamination present in your samples or your PCR workflow, because although these may not be targets for you they are valid targets for a correctly working PCR.
Looking for a compact PCR setup for your lab or extra equipment capacity at an affordable cost?
Bento Lab is a portable laboratory that combines 3 key tools — a thermal cycler for PCR, a gel electrophoresis unit, and a mini centrifuge — into a compact system for less than $2000.
During PCR, a target DNA region is specifically amplified from DNA template (DNA from your sample) using short DNA strands called “primers” to define the start and end of the target region, and a master mix containing the rest of necessary molecules for amplification (for more information on PCR see our Introduction to PCR guide). PCR protocols and primers are generally very carefully designed and optimised in order to be specific to their intended targets and to avoid non-specific amplification. Polymerase enzymes also have very high fidelity when copying DNA. This means that the probability of a single copying event going wrong under optimised conditions is extremely small. However, during a PCR there are billions of copying events occurring over 20-35 PCR cycles, so the chance of some errors occurring is almost inevitable.
Non-specific amplification problems begin when fragments produced by copying errors become amplifiable, for example if they start with a forward primer and end with a reverse primer, or if they form self-priming structures. These fragments can then be easily amplified by the primers in the PCR or by their own self-priming structure. Amplification will occur alongside, and in competition with, any target amplicons. Non-specific amplicons are often shorter than target amplicons and so they can be more easily amplified. Because of this they can quickly become highly concentrated within the PCR product, especially if they occur early on in the PCR cycles or if the total number of PCR cycles is very large.
In most PCRs non-specific amplification is not a problem because it is most likely to occur later on in the PCR cycle, by which time the target amplicon should have amplified to a high concentration and can easily outcompete any other amplicons formed. In this situation any non-specific amplification will be minor and may not even be noticeable unless a very high number of PCR cycles is used.
However, under some conditions PCRs can go wrong early on and produce a range of different non-target amplicons in concentrations high enough to be a problem, often outcompeting or obscuring target amplicons. In such cases they are a major problem and will have cause the PCR to fail, have untrustworthy results, or to be unsuitable for sequencing.
Interested in DNA methods and workflows? Subscribe for monthly insights.
Recognising non-specific amplification
Non-specific amplification is most easily recognised by comparison to the expected results of your PCR when visualised on an electrophoresis gel.
Usually in your PCR or PCR assay you will be expecting one or more bright discrete bands within specific size ranges, which will confirm that your PCR worked as expected. In contrast, non-specific amplification is generally visible in the form of very small unexpected bands (primer dimers), ladder-like patterns at the bottom of the gel, and short to long smears.
Figure 1 below shows a range of different types of non-specific amplification and gel artefacts that you may encounter during PCR. In this model based on the CHD1F-CHD1R Avian sexing assay, two correct results (female and male) are shown in lanes 1 and 10, while lanes 2-9 represent non-specific amplification and residual primers.
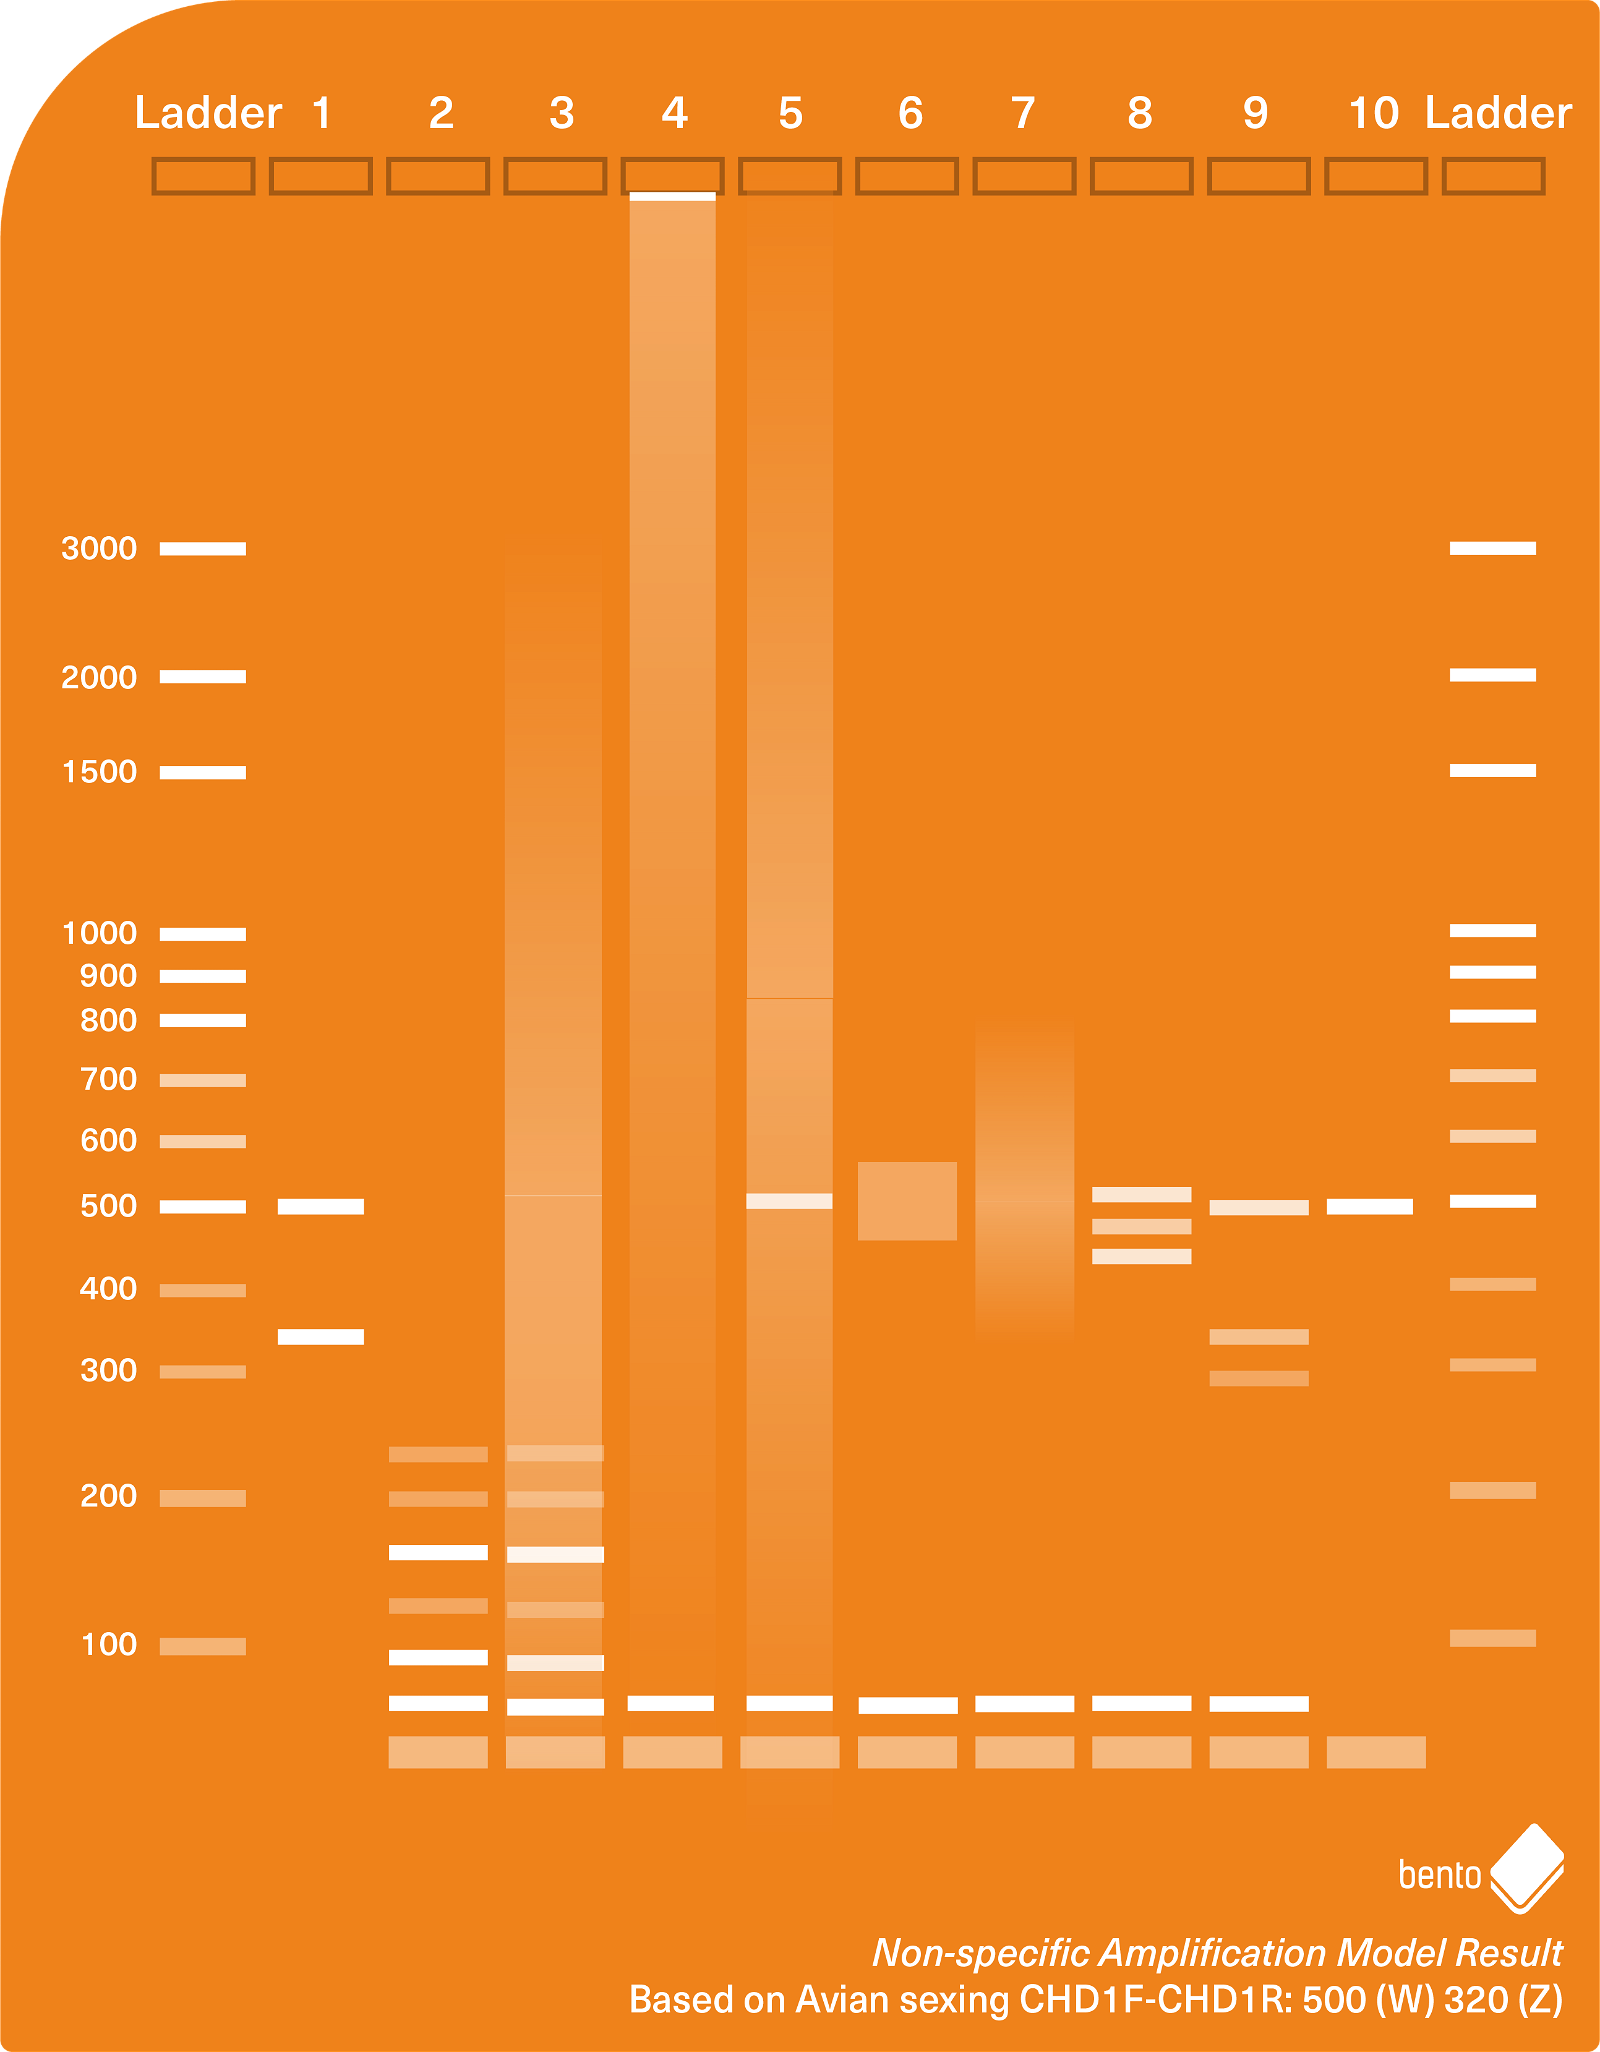
The lanes show, from bottom to top:
- Two target amplicons at 500 bp and 320 bp – a successful and expected result for the CHD1F-CHD1R Avian Sexing PCR assay for a female chicken.
- Residual primers, a primer dimer and multimer-like artefacts
- Results as for lane 2 but with an additional long smear
- Residual primers, a primer dimer, and a long smear, and DNA trapped in the well
- Residual primers, primer dimer, and a long smear, and a target amplicon
- Residual primers, primer dimer, and a short smear around 500 bp
- The same as lane 6 but with a longer smear
- Residual primers, a primer dimer band, and three non-specific bands produced between 400 bp and 500 bp.
- Two probable target amplicons (500 bp and 320 bp) and one non-specific band (~280 bp).
- Residual primers and one target amplicon (500 bp) – a successful and expected result for the CHD1F-CHD1R Avian Sexing PCR assay for a male chicken, with some additional residual primers indicating some were unincorporated after PCR.
You may encounter these different types of non-specific amplification artefacts, as well as residual primers, in any combination when assessing your PCR results.
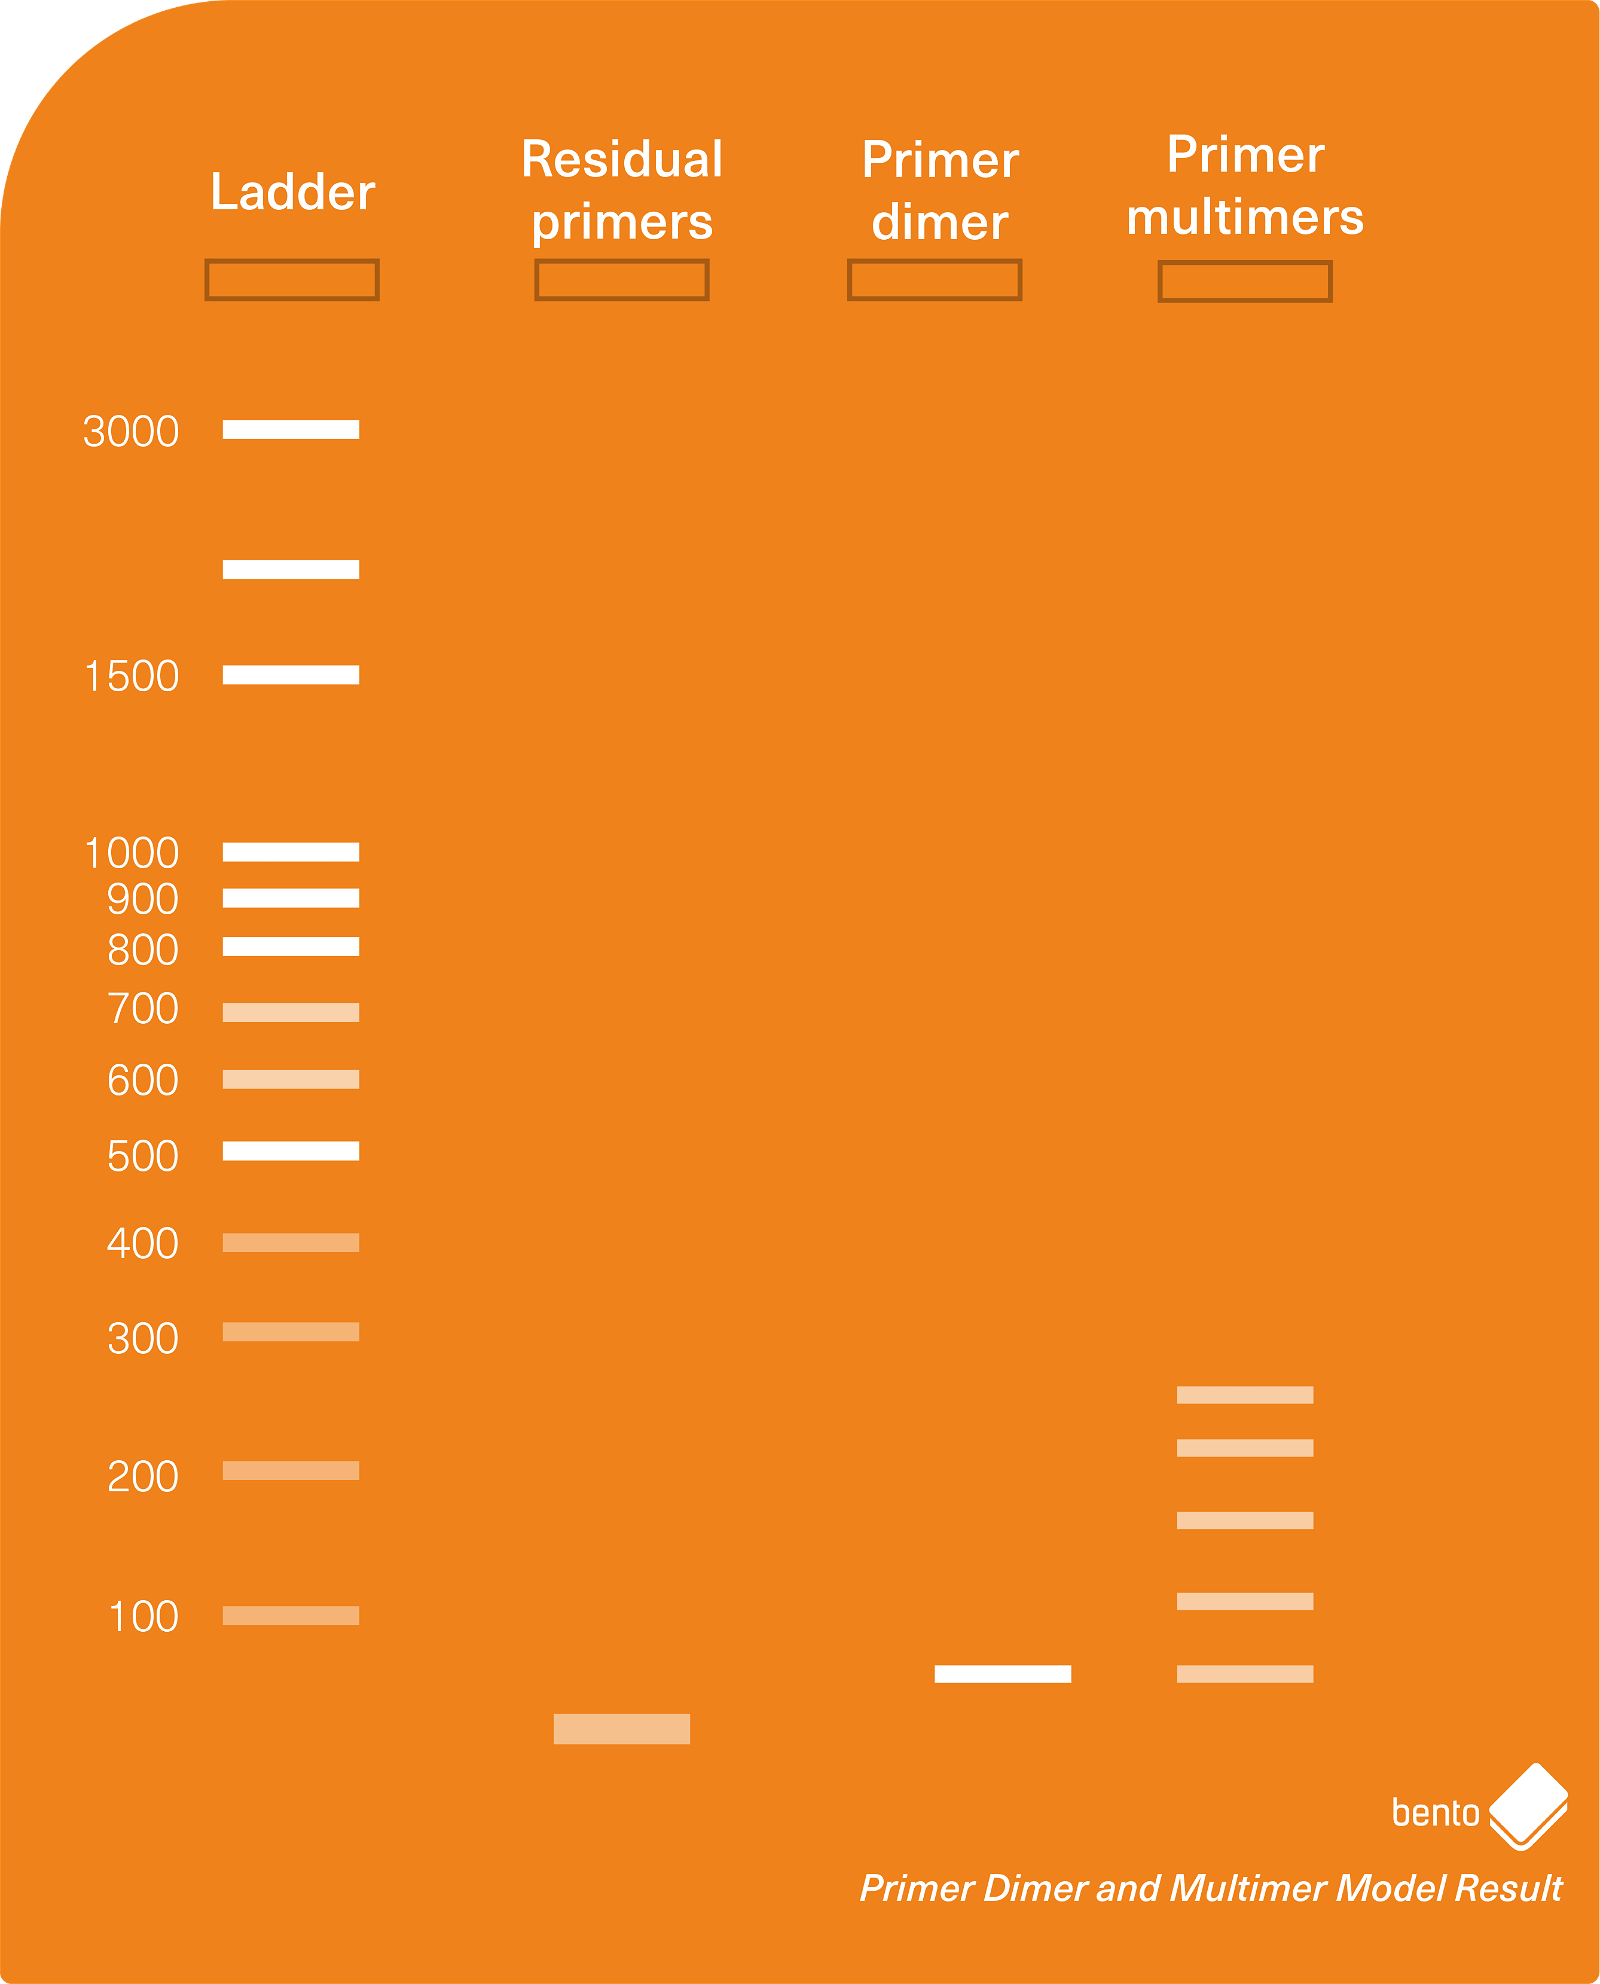
Primer dimers
Primer dimers are a very commonly encountered type of non-specific amplification. These are amplicons formed by two primers joining together (hybridising) to produce a single amplifiable unit. They usually produce amplicons of 20-60 bp length and are visible as a single bright band at the bottom of the electrophoresis gel. Primer dimers can form by direct hybridisation or by a range of other possible mechanisms that are not fully understood, but typically consist of the two primer sequences joined end-on-end, sometimes with additional nucleotides in between.
Primer dimers should not be confused with residual primers left over from PCR that were not incorporated into PCR products — these will be the size of the primers used, i.e. around 21-30 bp in length, and usually form a diffuse hazy band at the bottom of the gel.
Looking for advice on using Bento Lab?
Book a free consultation or ask a question.Primer dimers and unused primers are not a significant problem to most PCR applications. They are too small to interfere with interpreting results of PCR assays using larger amplicon lengths, and they will be removed by clean up processes prior to any sequencing application. However, primer dimers will compete with your target amplicons within the PCR and may reduce your PCR efficiency.
Primer dimers can become a significant problem if they join with other primer dimers, becoming amplifiable primer complexes or multimers of 100 bp, 200 bp, or more. Primer multimers can produce a laddering effect that can interfere with interpreting PCR results, and will interfere with sequencing of amplicons because they can’t be easily removed by enzymatic digestion or size specific precipitation clean-up methods.
If you are encountering primer dimers or multimers then you could consider reducing the primer concentration to reduce the chance of primer dimerisation; set up more quickly or on ice to reduce the chance of mispriming and low-level amplification during PCR setup; or use a hot start polymerase or PCR mastermix. If these adjustments do not remove any multimers then they may be non-specific amplification artifacts of a different kind.
In Figure 2 below, you can see a model gel electrophoresis result containing residual primers (around 26 bp in length), primer dimers (around 50 bp in length), and primer multimers in a banding pattern of increasing size.
PCR smears
PCR smears occur when DNA is randomly amplified, producing a wide range of DNA fragments of different lengths.
Smears can be caused by a range of different factors, such as high levels of DNA fragmentation that produces small or larger fragments that can self-prime; loading too much template DNA into the PCR which can increase the chance of self-priming. The primers could also be degraded, or the annealing temperature too low.
Smears are usually a significant issue for PCR assays — they can obscure or outcompete the results of PCR assays, and they can make amplicons impossible to sequence because they can’t be removed. If you get smears you will probably need to repeat the PCR.
Interested in DNA methods and workflows? Subscribe for monthly insights.
If you do get a smear during a PCR, you could try to dilute the DNA extract to reduce the probability of self priming prior to amplification. This will not work if the DNA is both highly fragmented and very low in concentration. In such cases it may be more effective to re-extract the DNA from the original sample, and trying to cause less DNA fragmentation while doing so. If none of your PCRs worked successfully with that primer set you may also want to replace your primers and see if that improves the results.
In Figure 3 below, you can see an agarose gel electrophoresis model result showing a variety of different types of smears you may encounter during PCR and gel electrophoresis. The phenomenon of a PCR product being stuck in the the well is discussed in more detail below.
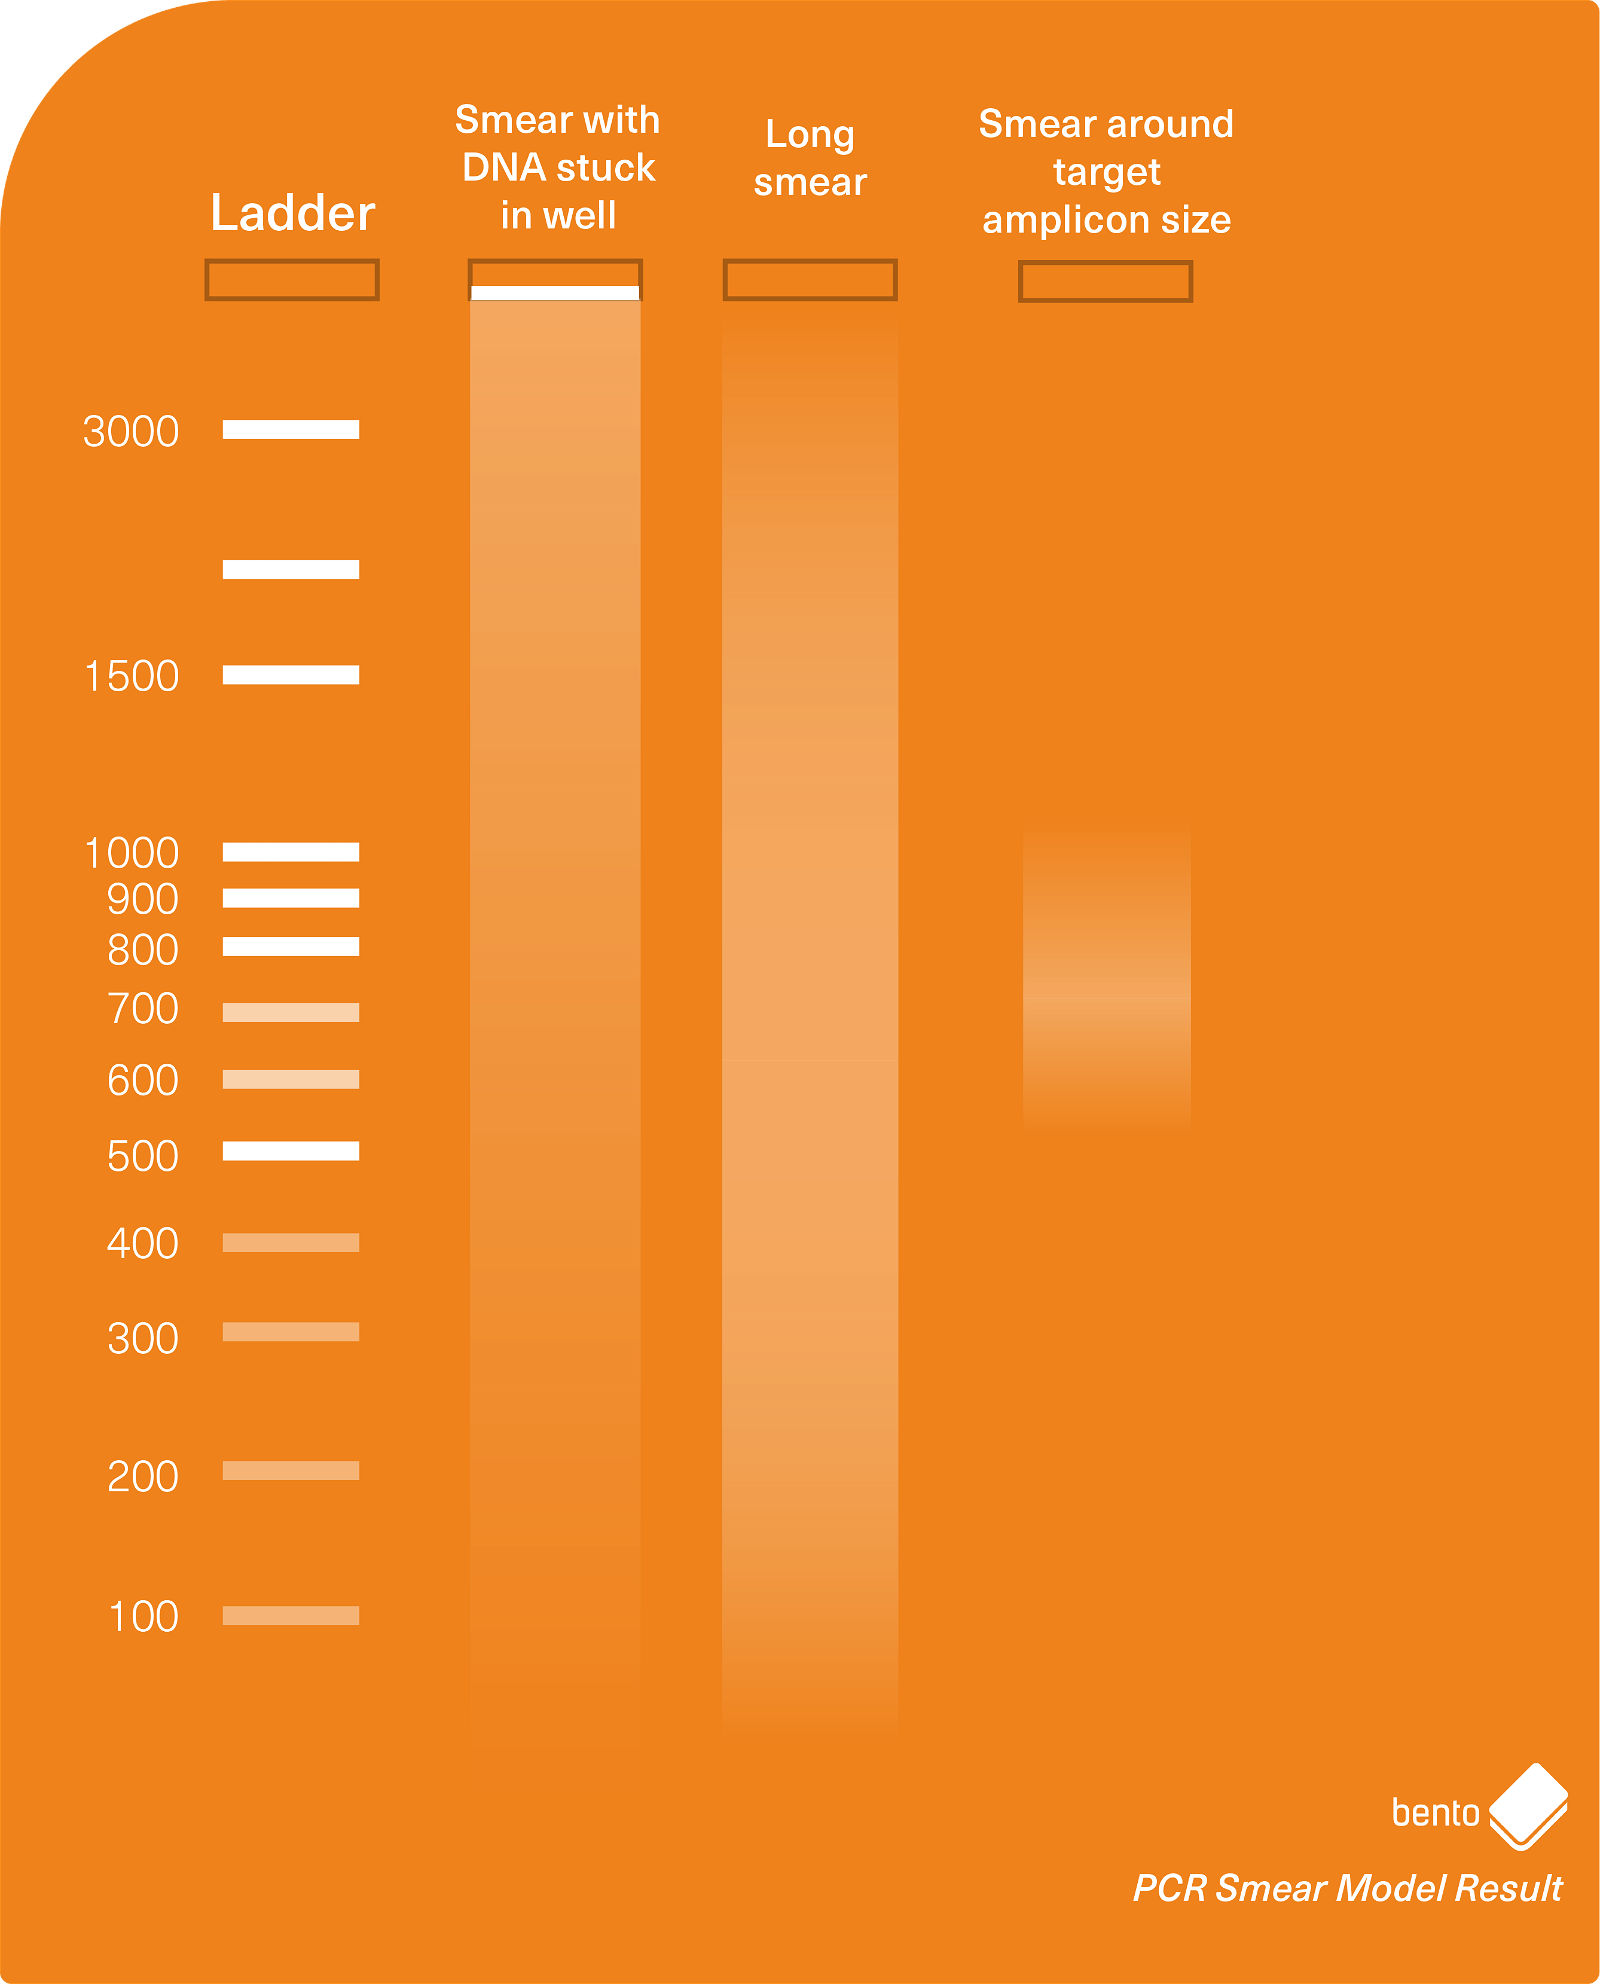
DNA stuck in the well
PCR products become stuck in the well when the fine mesh of agarose that composes the agarose gel are blocked for any reason. Although this may be caused by physical or chemical issues rather than non-specific amplification, the phenomenon can be associated with smears so it can be diagnosed side by side with it. It could also be caused by non-specific amplification in some cases if extremely large or complex DNA amplicons are produced.
Possible causes could include:
- Trying to reuse wells in an agarose gel
- An issue with the electrophoresis gel
- Microbial growth in loading dyes, or poorly mixed loading dyes
- Malformed wells
- Carryover of genomic DNA, proteins, salts, and other substances from the DNA extraction into PCR. In this case the visible bands could be residual materials carried over from the extraction rather than DNA produced in the PCR.
- Overloading of PCR product, especially if there is carryover from the DNA extract.
- An artefactual DNA complex produced by either non-specific priming or excessive extension time.
Looking for advice on using Bento Lab?
Book a free consultation or ask a question.To resolve it, you could troubleshoot each of the above issues in turn:
- Check the gel is working by examining the DNA ladder for a successful run. If it isn’t, recast the gel and retry.
- Check loading dyes by running a previously successful PCR product. If it is a problem, replace the loading dye.
- Check for DNA extract carryover by diluting it by 10x to 100x prior to PCR. If this is the problem then you may want to improve or troubleshoot your DNA extraction method to produce a cleaner DNA extract.
- Confirm that the PCR reagents and protocol are working by using a positive control.
Amplicons of unexpected sizes
Non-specific amplification can produce one or more amplicons of unexpected sizes, either smaller than expected, or larger than expected.
Amplicons of unexpected sizes are often difficult to differentiate from other PCR phenomena such as contamination of samples or PCRs by non-target DNA template, or amplification of multiple different copies of target DNA from a sample. Their identity will often remain a mystery unless they are specifically sequenced, but their occurrence can often be reduced or prevented by repeating the PCR with optimised conditions after troubleshooting.
In general, increasing the annealing temperature will increase PCR specificity and can help reduce non-specific amplification.
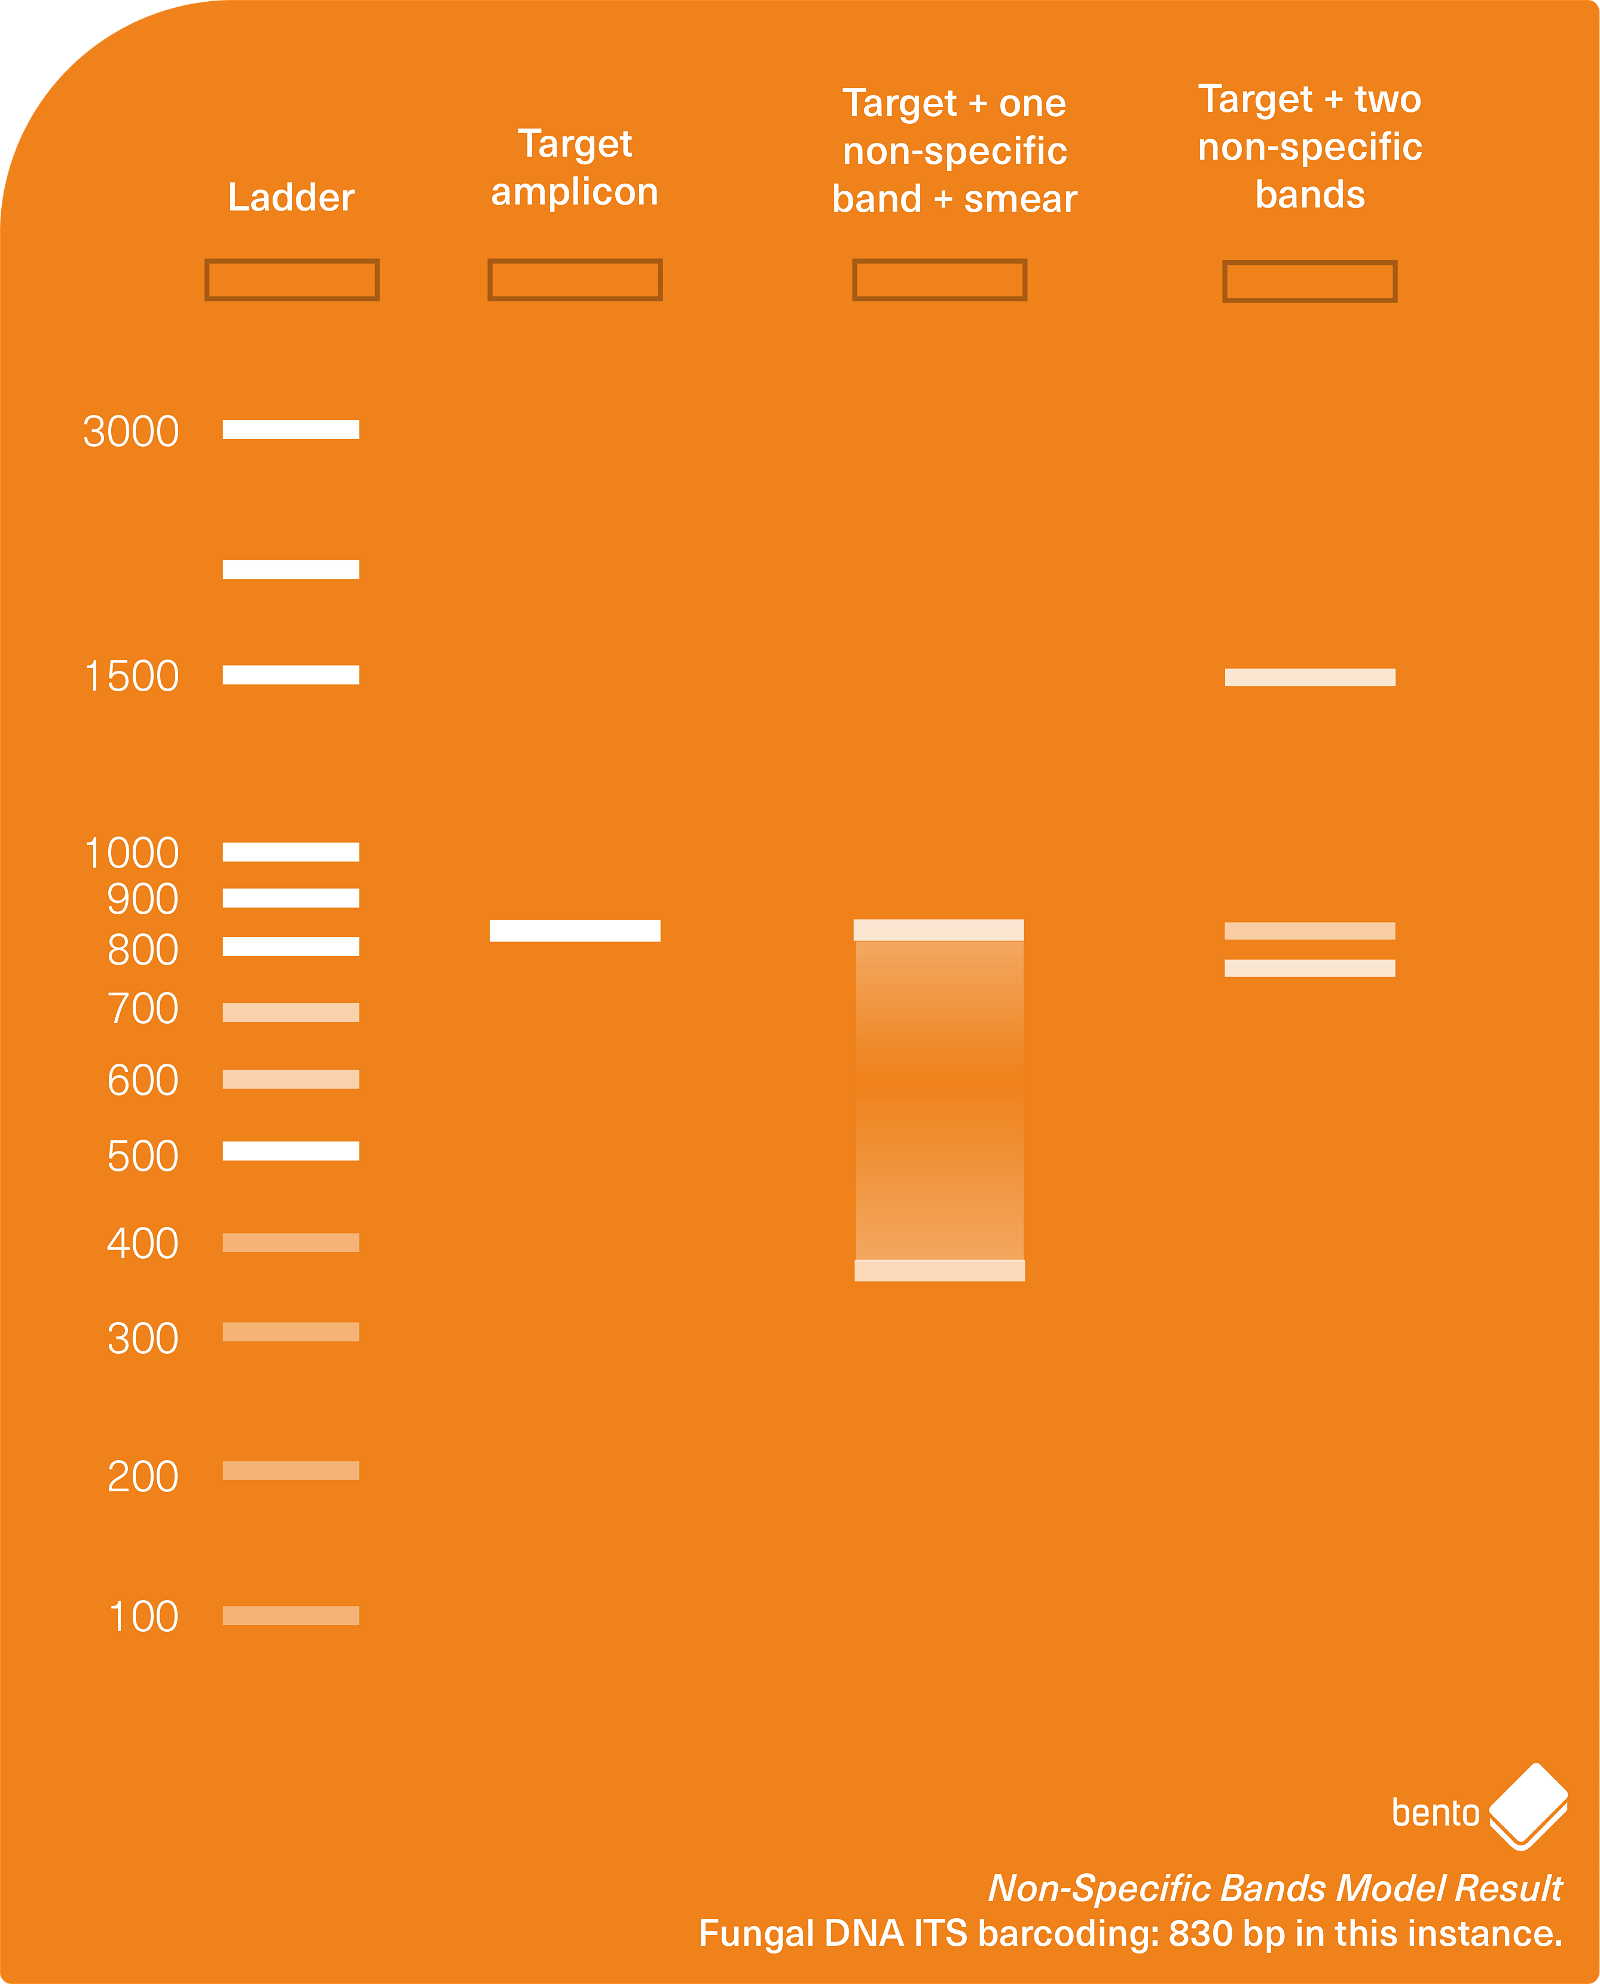
In Figure 4 below you can see a gel electrophoresis result showing a successfully amplified target amplicon, and also two cases of additional non-specific amplification.
Why does non-specific amplification occur, and how can I prevent it occurring?
PCRs are optimised to specifically amplify target regions of DNA and to minimise non-specific amplification, but although some PCR protocols are very forgiving and allow for a wide range of variation in PCR conditions, others will not work well outside of very specific parameters. Whether your PCR assay is forgiving or not will depend on how complicated your PCR assay is in terms of numbers of primers used, and specific details of your primers and target DNA region.
Interested in DNA methods and workflows? Subscribe for monthly insights.
Non-specific amplification can occur whenever a PCR is operating outside of its optimised range of parameters and conditions. It can also occur when PCRs are poorly or not appropriately designed, either in terms of primers being non-optimal for the specific target organism, or in terms of optimisation of the PCR conditions. To prevent it, you will need to identify which step of your PCR is causing issues and repeat the PCR with new and optimised conditions.
PCRs are complex and there are many potential causes of non-specific amplification. The critical steps that can trigger non-specific amplification during PCR occur primarily at the PCR setup stage, but the annealing and extension stages can also cause issues. Excessive PCR cycles can also be a major factor in increasing the impact of non-specific amplification.
Troubleshooting Non-Specific Amplification
The main causes of non-specific amplification are listed in the table below with potential solutions. When troubleshooting, it can be useful to examine your PCR protocol and workflow step-by-step to try to identify if any of the issues below may be potentially causing your problems. You can then address the most likely candidates one by one, while keeping everything else the same, to see if this reduces or removes non-specific amplification.
| PCR SETUP | |
| Possible cause of non-specific amplification | Problem and Solution |
| Ambient PCR setup temperatures are too high | Problem: Low level polymerase activity during PCR setup is increased by higher ambient temperatures. Solution: Set up on ice, set up very quickly, or use Hot Start PCR mix/polymerase. |
| PCR setup times are too long | Problem: Low level polymerase activity during PCR setup is more likely to occur over longer durations of setup. Solution: Set up PCR quickly, set up on ice, or use Hot Start PCR mix/polymerase. |
| Primers are too concentrated | Problem: Concentrated primers increase the likelihood of primer dimer formation. If you are seeing strong bands from residual primers together with strong amplicons then you can probably use less primers without affecting your PCR results. Solution: Use less concentrated primers. |
| MgCl2 concentration is too high (if additional MgCl2 is added) | Problem: MgCl2 added to make the PCR less specific also increases the likelihood of non-specific amplification occurring. Solution: Add less MgCl2 to the PCR mix. |
| DNA template concentration is too low | Problem: Very low levels of DNA template could make target amplicon production less competitive compared to primer dimer formation. Solution: Increase DNA template concentration |
| DNA template concentration is too high | Problem: Very high concentrations of DNA template could result in non-specific amplification, especially if the PCR is not optimally set up. Solution: Use less template DNA. |
| Single stranded DNA template is too fragmented | Problem: Extremely fragmented DNA templates produced via quick and dirty DNA extraction methods may produce fragments of single stranded DNA that can act as primers. Solution: Extract less DNA from a smaller sample, dilute it to reduce the potential for mispriming, or use a DNA extraction method that produces less fragmentation. |
| Primers are not specific enough for the intended purpose | Problem: Some primers may not be appropriate for your application, even after optimisation. Solution: You may need to obtain new primers that are more appropriately designed for your purpose. |
| Primers may be degraded | Problem: Your primers may have degraded and fragmented into shorter strands of DNA, resulting in mispriming of non-target regions. Solution: Obtain and use new primers. |
| ANNEALING STEP | |
| Possible cause of non-specific amplification | Problem and Solution |
| Annealing temperature is too low | Problem: The annealing temperature is too low resulting in the primers annealing to non-target regions of DNA prior to extension and amplification. Solution: Check annealing temperatures for your protocol (or calculate the ideal melting temperature [TM] of your primers). Increase annealing temperature. |
| Annealing time is too long | Problem: The annealing time is too long resulting in increased likelihood of non-specific annealing prior to extension and amplification. Solution: Reduce the annealing time to 30 s. |
| EXTENSION STEP | |
| Possible cause | Problem and Solution |
| Extension time is too long | Problem: Excessively long extension times can increase the likelihood of non-specific amplification. Solution: Use an extension time of 60 s per 1,000 bp of expected amplicon length, for example 30 s for a 500 bp amplicon. |
| Extension time is too short | Problem: Excessively short extension times can be insufficient for target amplicon amplification, resulting in preferential amplification of shorter non-specific amplicons. Solution: Use an extension time of 60 s per 1,000 bp of expected amplicon length, for example 30 s for a 500 bp amplicon. |
| NUMBER OF CYCLES | |
| Possible cause of non-specific amplification | Problem and Solution |
| The numbers of PCR cycles used is excessive for your needs | Problem: Greater numbers of PCR cycles increase the likelihood of non-specific amplification occurring. Solution: Use an appropriate number of PCR cycles for the concentration of DNA template added: 25-30 cycles for high concentrations of template DNA and 30-35 for lower concentrations. |
Conclusion
Non-specific amplification can be a major issue when doing PCRs and PCR assays, and can make results difficult to interpret, unreliable, or cause them to fail entirely.
There are several different types of non-specific amplification which you may encounter, including primer dimers, primer multimers, smears, and production of discrete non-specific bands. These can occur individually or together, and with or without your target amplicons.
Non-specific amplification can occur whenever your PCR is operating outside of its optimised condition to the point of it no longer being specific. For some PCRs you can vary the conditions a lot without affecting results, while for others any adjustments may cause the PCR to fail and produce non-specific amplification, and this will depend on the exact composition and conditions of your PCR.
To troubleshoot non-specific amplification, it is useful to work through the PCR step-by-step to identify possible causes, using the table above. Often problems in your workflows can be identified and resolved by testing and changing a few parameters in only one or two experiments.
Please let us know what other resources, advice, and tips and tricks for using Bento Lab that you would like us to produce in the future!
Looking for advice on using Bento Lab?
Book a free consultation or ask a question.