If you’re working with PCR, you will probably at some point come across the problem of PCR product contamination, where DNA that you have previously amplified has somehow contaminated your latest results.
PCR product contamination is a real concern and something to be very aware of when doing PCR, but fortunately with a few precautions and good lab hygiene it can be minimised or entirely avoided.
To help you do this, in this article, we explain:
- What is a PCR product?
- What is PCR product contamination?
- Why is it a problem?
- How is it detected?
- How does it occur?
- How can you minimise PCR product contamination risk?
- How can you decontaminate Bento Lab, equipment, and work surfaces?
- How can you minimise PCR product contamination in your reagents by aliquoting?
What is a PCR product?
A PCR product is the DNA that is created during a polymerase chain reaction (PCR). In other words, it is the DNA product of the PCR.
If your PCR was successful, the PCR tube will contain billions of identical copies of the specific DNA sequences that you wanted to amplify (the PCR product), as well as any components of the PCR mix that were not used up or degraded during PCR.
Because the PCR makes so many copies, the PCR product is extremely concentrated. The high concentration allows it to be be visualised on an agarose electrophoresis gel (e.g. when visualising PCR assay results), and for DNA sequencing using Sanger sequencing or other sequencing technologies.
Unfortunately, this high concentration also makes it a potential contamination hazard that can contaminate future PCRs.
What is PCR product contamination?
PCR product contamination occurs when some of the extremely concentrated DNA “escapes” from its original PCR tube into your workspace. Even the tiniest droplet of liquid can carry hundreds of thousands or millions of DNA copies.
Once it has escaped, this highly concentrated DNA can potentially be spread around your workspace on gloves, pipettes, and equipment. While it will become more diluted as this occurs, it is so concentrated that it can still contaminate your reagents and PCR mixes, and amplify in your PCRs as a contaminant.
Why is PCR product contamination a problem?
PCR products are particularly problematic as contaminants because they’re:
- Extremely concentrated — even a tiny diluted trace has a lot of DNA
- A perfect match for your primers — since the DNA was previously amplified with your primers, the start and end of the fragment will contain binding sites for your primers.
- Stable molecules — the DNA is double-stranded, makingit very stable, resistant to degradation on surfaces, and very resistant to degradation when in buffered reagents.
This means:
- A small amount of contamination can act like adding extra DNA template to your PCR, giving you a false positive or false result if the same primers are used
- The DNA can stay on surfaces or in reagents for a long time (unless it’s removed or the reagents replaced)
- The DNA can be easily spread around your workspace on gloves, pipettes, or equipment
- If this happens, you will get incorrect results in PCR assays, and it will interfere with downstream uses of PCR products such as DNA sequencing
If you notice PCR product contamination when it happens (for example by using negative controls), then the good news is that you may waste some time and money, but you will usually be able to repeat the experiments and get back on track.
But if you have contamination and you don’t notice it, then you could be interpreting false positive PCRs as real results, resulting in incorrect results and conclusions.
How can you detect PCR product contamination?
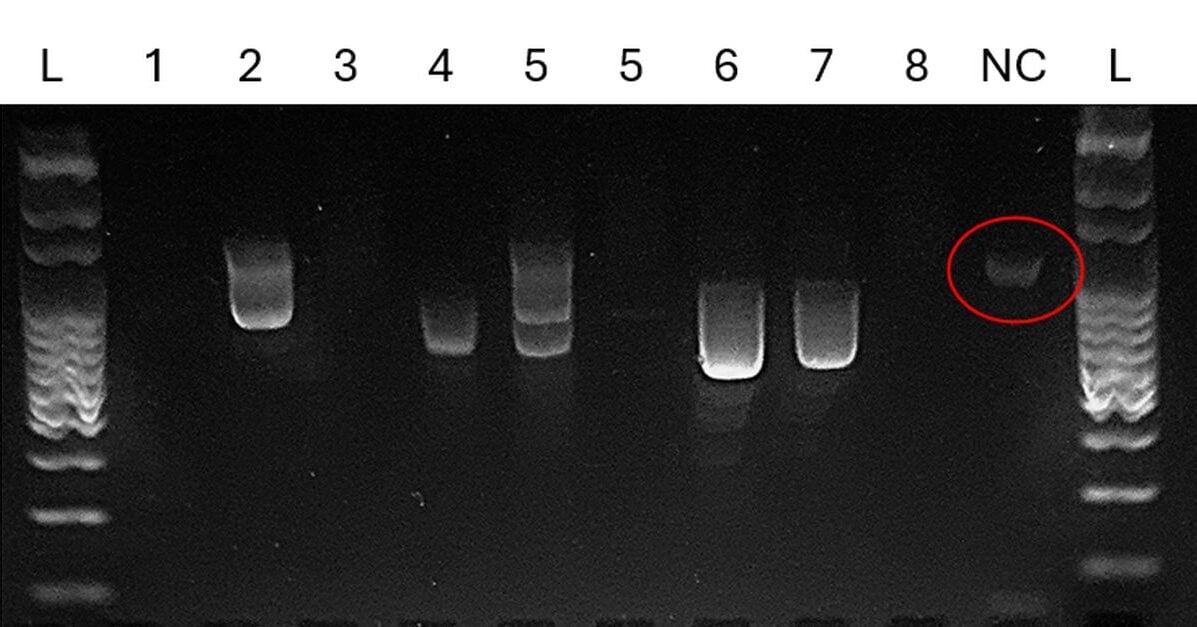
PCR product contamination in your PCR mix or reagents can be detected by running a negative control (a PCR with water instead of DNA template from a sample) alongside your sample PCRs, and visualising the results in an agarose electrophoresis gel.
In a perfect PCR, the negative control should show no band at all, because there was no DNA added.
But if a band of the expected size for the PCR assay is seen in the negative control lanes, this indicates that contamination is present. The band may be very faint (indicating very trace contamination), or brighter, depending on the degree of contamination.
However, PCR product contamination will only be detected by using primers that can amplify the fragment – usually the same primers that originally amplified the contaminant, but also any primers with binding sites within the amplified fragment. The contamination will not be detected using other primers.
How does PCR product contamination occur?
PCR product contamination of your workspace can occur at any point after a PCR tube is opened post-PCR. There is a risk of it occurring whenever when you handle PCR products, or anything that has made contact with PCR products, such as when you are:
- Opening PCR tubes
- Pipetting PCR products
- Handling agarose gel tanks, gels, and running buffers (after exposure to PCR products)
- Handling PCR products for any post-PCR applications (e.g. for sequencing)
Fortunately, much of the risk of PCR product contamination can be avoided by being careful at each of these stages.
How can you minimise PCR product contamination risk?
A useful way to think about the risks of handling PCR products is to compare it to cooking with raw chicken, which if not handled correctly can spread harmful bacteria into your cooking environment and food. This risk means that cooks work very differently with raw chicken than with other food, such as by preparing it on a different chopping board to other food; avoiding cross-contaminating other foods; washing hands carefully, and thoroughly disinfecting surfaces afterwards. By doing this, cooks can work comfortably with something that has a real risk of causing food poisoning.
Similarly, when running PCR workflows, you should think about any steps after the PCR has run as being high risk for releasing PCR product contamination, and keep anything that you need to ensure is uncontaminated away from anything that may have come into contact with the PCR products.
As general guidance, you should:
- Always wear gloves, and change them at any point where they may have got contaminated with PCR products
- Prepare samples and PCR mixes (pre-PCR) in a different area, or on a different tray, to where you work with PCR products
- Use a separate dedicated pipette for pipetting PCR products
- Use filtered pipette tips if possible
- Decontaminate your work surfaces and equipment regularly or after each workflow (described below).
Careful handling of PCR tubes and anything that comes into contact with PCR products will go a long way to minimising the risk of PCR product contamination, and it is worth paying particular attention to prevention steps described in the table below:
| Source of Contamination | How Contamination Occurs | Prevention |
| Opening PCR tubes | DNA on the lid can spatter or form tiny airborne droplets (aerosols) when opened; touching inside of lid transfers DNA to gloves | – Briefly centrifuge tubes before opening – Open carefully to avoid splatter or aerosols – Do not touch inside of lids – Wear gloves and change them as needed |
| Pipetting PCR products | Aerosols of PCR products can be drawn into pipette body; expelling samples can cause aerosols and liquid splatter; contaminated tips may touch surfaces; gloves may transfer DNA to pipettes. | – Use a dedicated pipette for PCR products – Pipette slowly to avoid aerosols – Do not touch pipette tips to anything other than the tubes – Use filter tips where possible – Dispose of used tips carefully – Change gloves when handling PCR products – Regularly decontaminate pipettes |
| Handling gel tank, buffer, or gels | DNA can escape wells, diffuse into buffer, or contaminate the gel tank; buffer and gels may spread contamination if touched directly. | – Handle gel tank carefully after loading samples – Change gloves after touching tank interior – Decontaminate tank and accessories regularly – Dispose of buffer and gels carefully away from your workspace |
| Post-PCR handling (cleanup, dilution, restriction digests) | Additional handling steps create more chances for spillage, aerosols, or cross-contamination onto equipment, surfaces, or reagents. | – Treat post-PCR steps with the same caution as pipetting – Use dedicated equipment for post-PCR work – Decontaminate surfaces and tools regularly – Keep pre- and post-PCR workflows separate |
How can you decontaminate Bento Lab, equipment, and work surfaces?
A simple decontamination procedure can be done whenever required, using a 10% dilution of thin domestic bleach (diluted thick bleach is also fine, as are hypochlorite tablets), a tiny drop of detergent (to help with wetting evenly instead of beading up), a spray bottle, paper towels or tissue paper, and a plastic tray.
The equipment you can decontaminate with bleach are:
- Gel box lid (try to avoid getting liquid in the female banana plug sockets).
- Gel box base
- Combs
- Dams
- Pipette (if required, disassemble the pipette and bleach the inside of the nose: consult your pipette manual on how to do this)
- Tube rack
- Bento Lab surfaces (see below).
- Work surfaces (if plastic)
To decontaminate equipment, you can:
- Wearing gloves, remove the lid of the Bento Lab electrophoresis gel box from the base, and place all the parts of the gel box (including dams and combs) on a plastic tray. The cables should be on the tray but carefully placed to avoid getting them wet inside the banana plugs.
- Place any other items for decontamination on the tray as well. Do not place the main Bento Lab unit on this tray: it should be decontaminated separately via wiping as described below.
- Spray everything on the tray with the decontamination solution, then turn everything over and spray again.
- Leave for 10–15 mins.
- Take the tray to a sink. For the gel box base, lid, combs, dams, and lid, rinse off the bleach. For pipettes, wipe or briefly rinse off any bleach, but avoid getting liquid inside the pipette (this will make it take longer to dry).
- Wipe parts dry.
Never clean the Bento Lab electrophoresis gel box with solvents (including alcohols and alcohol wipes). The gel box is made from acrylic plastic (like most agarose gel boxes), and exposure to solvents can cause stress fractures and other types of damage.
To decontaminate Bento Lab, you can:
- Unplug Bento Lab.
- Wearing gloves, using the same diluted bleach on a tissue paper, carefully moisten the Bento Lab’s surface until it is covered in a thin film.
- Leave for 10-15 minutes.
- Moisten a tissue with tap water and wipe over repeatedly to rinse off the bleach, then dry.
To decontaminate plastic work surfaces, you can:
- Spray the surfaces with diluted bleach
- Leave for 10-15 minutes.
- Wipe off with a dry tissue, and then wipe down with a wet tissue to remove any bleach residue.
How can you minimise PCR product contamination in your reagents by aliquoting?
When you detect PCR contamination, there is a possibility that your reagents or PCR-grade water could be the source of the contamination, especially if you haven’t adequately separated your pre-PCR and post-PCR workflows. This means that even after decontaminating your equipment that you could still see PCR contamination in your next PCRs.
To help guarantee your next results are contamination-free, you could use entirely new reagents and PCR-grade water. However, this can be expensive and takes time if you need to reorder anything.
To reduce the risk of contaminating your reagents, you could consider subdividing (aliquoting) the PCR master mix, primers, and PCR-grade water into smaller volume tubes, such as a volume just slightly more than you would use in a single run. This means that if you do detect PCR product contamination, then the suspect reagents are already nearly used up anyway, and there is little or nothing to discard. And for your next session, you know that you have uncontaminated reagents in your freezer for the next session.
Importantly, when aliquoting, ensure that you are using a contamination-free pipette and tubes.
It is a good idea to label your potentially contaminated reagents and store them separate to your other PCR reagents, but do not discard them: you can individually test these for contamination later on, or use them for PCRs with different primers that will not amplify the contaminant.
If you have any questions, please get in touch!
Please let us know what other resources, advice, and tips and tricks for using Bento Lab that you would like us to produce in the future!
Looking for advice on using Bento Lab?
Book a free consultation or ask a question.