Brought to you by the team at Bento Bio on the mission to make DNA lab work accessible to all. We create powerful, easy-to-use devices, affordable supplies, and guides, to help anyone—from beginners to professionals—harness the power of PCR anywhere.
In this article we suggest a simple method for accurately budgeting for consumable reagents and supplies for DNA extraction, PCR, and agarose gel electrophoresis workflows.
The method involves building a spreadsheet to calculate the exact usage of each item for a given number of samples in each step of a workflow, and then summing up the items used in each workflow.
You can then use this information to calculate:
- The cost to process one batch of a given number of samples
- The amount of each item to buy or use to process a given number of samples
- The most costly parts of your workflow
- Areas where you might be able to save money
All of these examples are included in a free spreadsheet. To get a copy of the spreadsheet, just enter your email below and we will send it to you. (You will also get our free newsletter with tips for making PCR work in the field. Of course you can unsubscribe at any time!)
Get free PCR Workflow Budgeting Spreadsheets
The examples in this article are based on workflows using Bento Lab and our reagents and consumables. Feel free to adapt and modify them for your own use.
Building a Costings Spreadsheet
To build a costings spreadsheet (for example, for our HotSHOT DNA Extraction workflow), you can:
- List each step in the task in a column, adding enough detail to indicate what is needed in that step. The steps that you list will differ depending on the exact protocol that you are using.
- List every item that you are using in a row at the top, including the units being used (e.g. µL or tips or tubes). The items that you add will also change depending on what protocol you’re following.
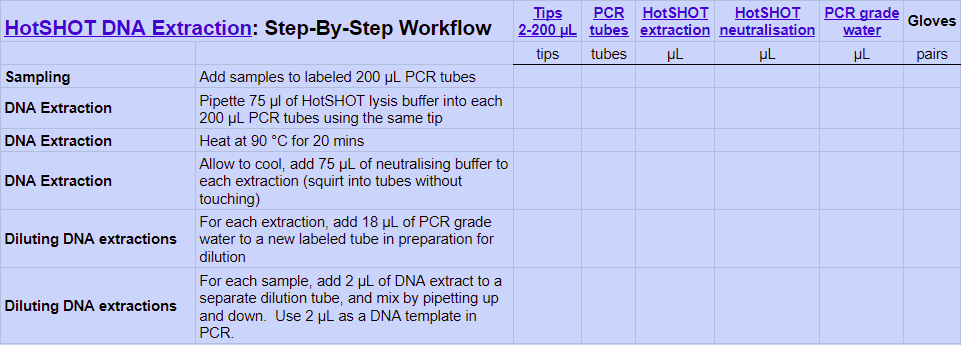
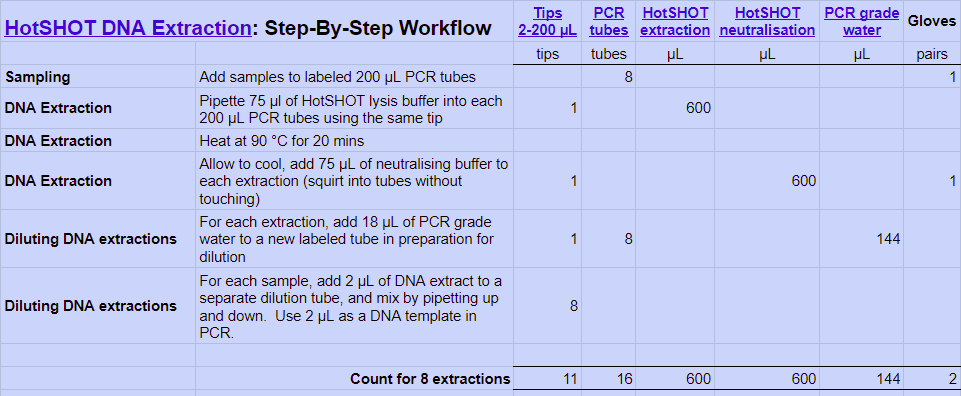
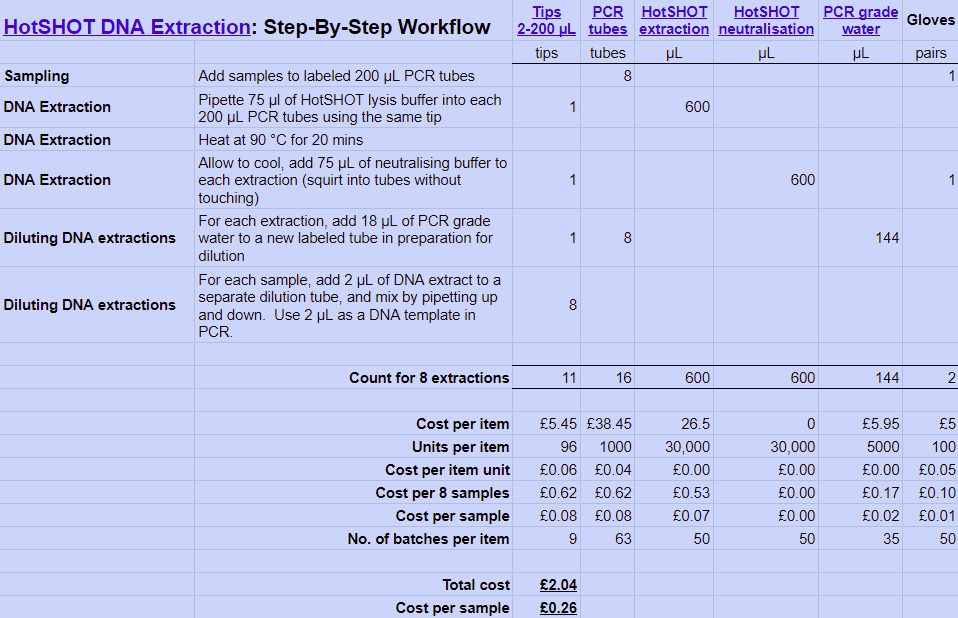
You can then populate the table according to the number of samples that you want to do, calculating the number of units of each items used by working through the process either in your head, or by doing a dummy run and recording item usage. Here we have entered the amounts of each item needed for eight HotSHOT extractions.
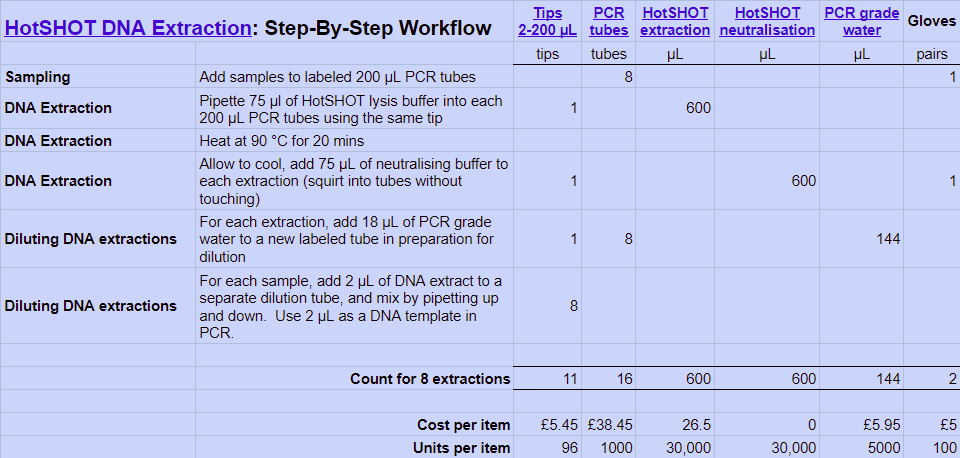
To calculate costs, you can then enter the cost of each item as bought together with the amount purchased (e.g. number of tips, or volume of a reagent).
In this example I’ve entered the current costs of items bought from the Bento Lab store (with estimated glove prices), but you should adapt this to reflect the actual costs of the products you are using, including tax and shipping if you want to include the whole cost.
Looking for advice on using Bento Lab?
Book a free consultation or ask a question.If you are using any DNA extraction or cleanup kits you should associate the kit cost only with one item within that kit, and if one item in that kit limits the number of samples that can be processed then that should be used. For example, if you are costing using our HotSHOT kit then the cost should only be associated with one of the buffers to avoid double-counting usage costs.
Extending this table, you can then calculate:
- The cost of each unit of each item (cost per item / units per item)
- Cost per a batch of samples (e.g. 8) (count for 8 extractions * cost per item unit)
- Cost per sample (cost per 8 samples / 8)
- The number of batches of this size that can be done with that item (units per item / count for 8 extractions)
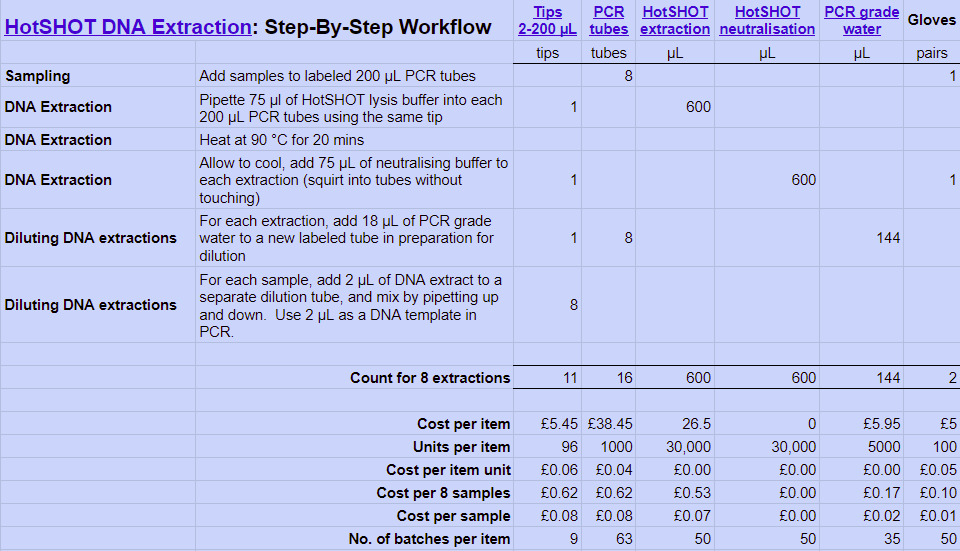
You can then work out the total cost of a batch of the process, and the total cost of processing that sample.
Using Your Costings Spreadsheet
You can now use your costings spreadsheet to get a much better understanding of what you need to buy, how much it will cost, and areas that you can modify to save money.
What you need to buy: You can look at the “no. of batches per item” row to see which items will run out first, and decide whether you need to buy more of a particular item, or less of other items. For example, in the table above you can see that pipette tips are the limiting factor and will run out after nine batches of eight extractions (ignoring any other pipette tip use in other steps).
How much will it cost?: You can add up all the values in the “cost per item” row to get the total cost of all of the reagents and consumables. Don’t forget to include tax and shipping to get an accurate value, as these can add a substantial amount to the overall costs.
How to save money?: If you intend to do a large number of samples it is worth considering whether buying in bulk can save you money. Additionally, you can look at the most costly items in the sheet and see if you can somehow reduce their costs, for example sourcing cheaper items from different suppliers, using smaller volumes, or by making extraction buffers yourself.
Importantly, since this is a dynamic spreadsheet, you can test out the impact of any of these changes on the overall costs to ensure that you’re getting the best value for your money without compromising results.
Interested in DNA methods and workflows? Subscribe for monthly insights.
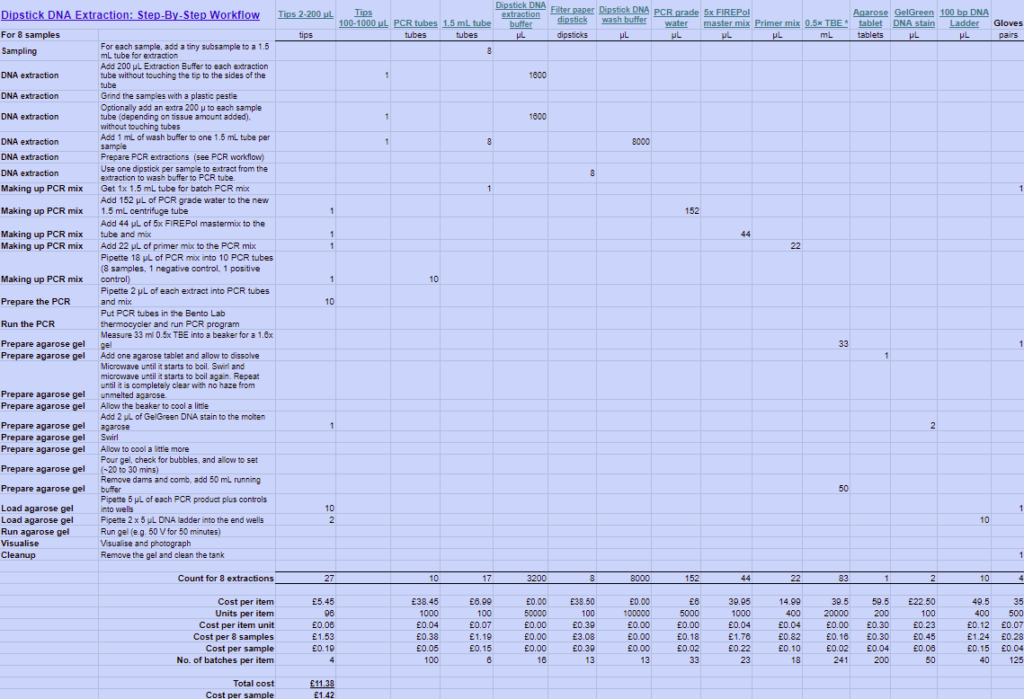
Example 1: Dipstick DNA Extraction Protocol
The costs involved in extracting DNA using our Dipstick DNA Extraction Kit have been calculated below. As you can see, the costs are more than double that of the HotSHOT DNA extraction, primarily due to the costs of the Dipstick DNA Extraction Kit.
To reduce costs you could look into sourcing cheaper 1.5 mL tubes (which could be a not-insignificant saving), or you could make your own Dipstick DNA Extraction kit if you feel inclined and have access to the appropriate chemicals.

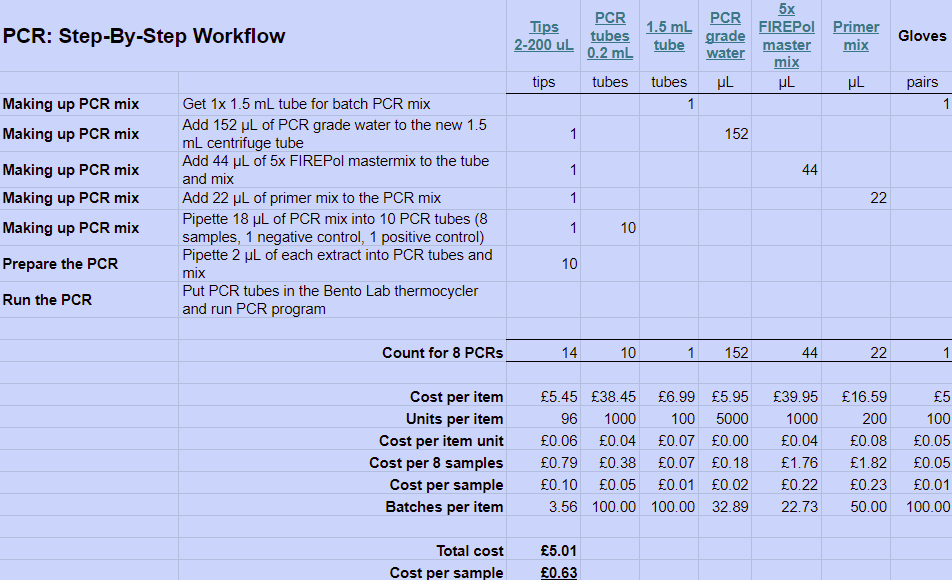
Example 2: PCR
The table below shows the costs involved in PCR using our standard FIREPol PCR master mix and 20 µL PCRs.
As you can see the greatest costs are the PCR master mix, followed by the cost of the 200 µL tips. To save money, you could consider using a smaller volume PCR (e.g. 10 µL, saving £0.10 a PCR) and sourcing cheaper tips.
You can also see that you will need to buy more pipette tips if you want to do more than three batches of eight PCRs.
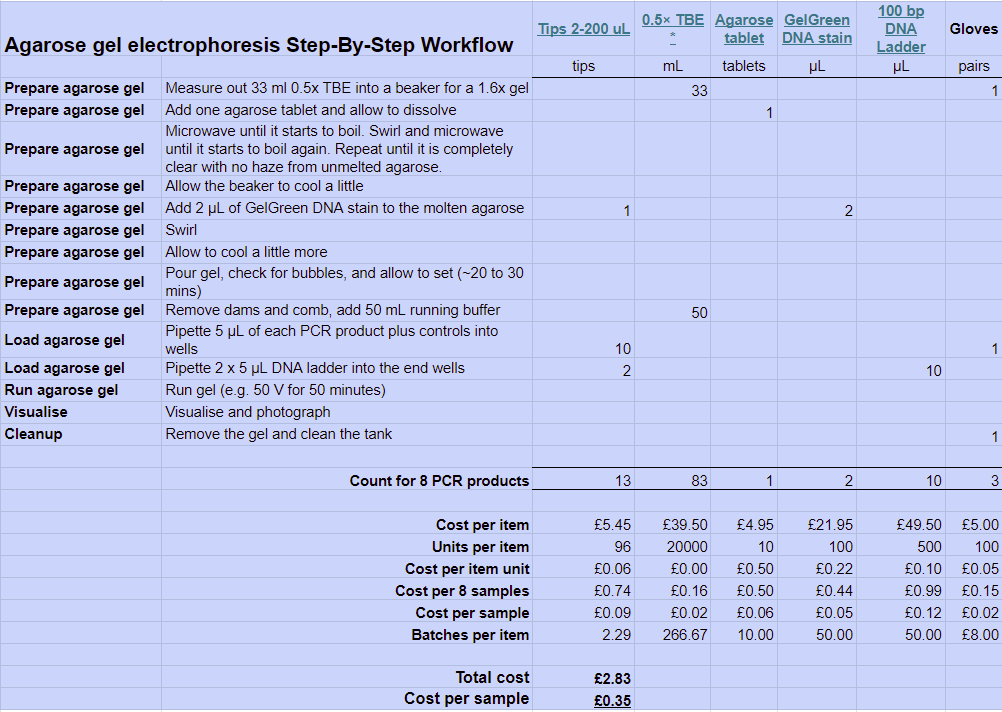
Example 3: Agarose Gel Electrophoresis
The table below shows the costs for agarose gel electrophoresis, using a single agarose tablet and GelGreen DNA stain.
The most significant costs are the DNA ladder, followed by pipette tips and the agarose tablet.
Cost savings could be made by using less DNA ladder (3 µL or 2.5 µL should still give reasonable band brightness), sourcing cheaper pipette tips, and avoiding using two agarose tablets for 2% agarose gels unless absolutely necessary.
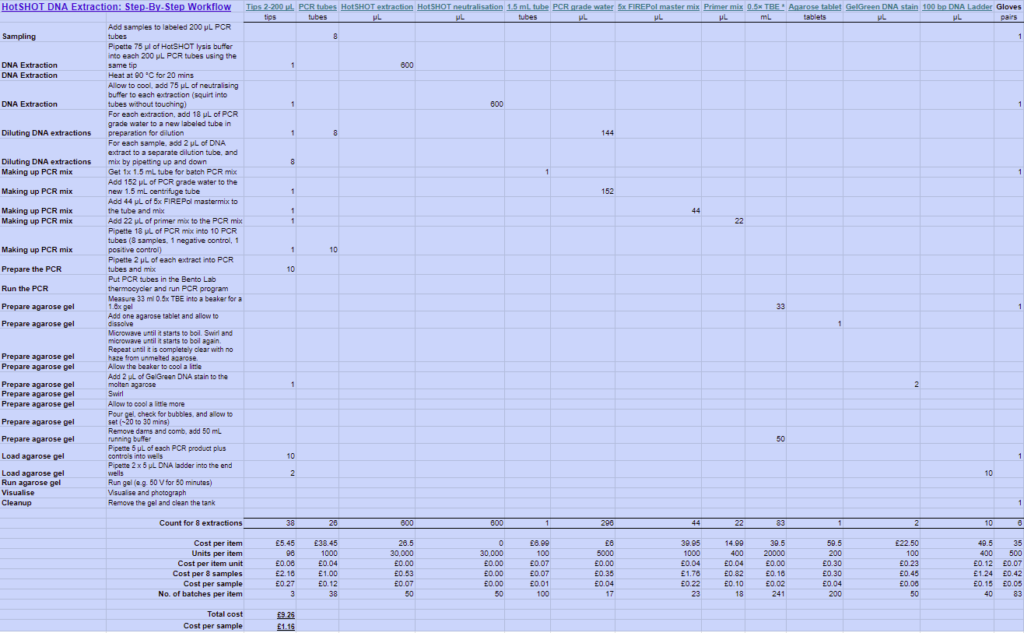
Example 4: A complete DNA Extraction, PCR, and gel electrophoresis workflow from start to finish (HotSHOT)
You can also combine the different parts of your workflow together to get an overall costing per sample, for example for our HotSHOT DNA extraction method. At this point the table gets quite big!
Example 5: A complete DNA Extraction, PCR, and gel electrophoresis workflow from start to finish (filter paper dipstick method)
Similarly, you can combine the different parts of the filter paper dipstick DNA extraction protocol, PCR, and gel electrophoresis together to get an overall picture of costs using this method:
Additional costs to consider
It’s easy to forget about some of the additional costs that you may have to cover, so here are three that you shouldn’t forget:
Taxes, duties, and tariffs: You will almost certainly need to pay some form of taxes on your products. Taxes, duties, and tariffs may not be included in the initial purchase price, especially if you are importing products from a different country, and they can often add an additional 20% or more to the initial cost of your items.
Shipping: Shipping costs can sometimes be substantial, especially for bulky items shipped over large distances, or for multiple items bought from different suppliers.
Failures: Everyone doing PCR will encounter some failures at some point of the process, and these can occur for a very wide range of reasons from simple mistakes to issues with your samples or reagents. It’s difficult to estimate the cost of failures because they could be low if you are working with easy to amplify targets using familiar methods, or high if you’re doing large batches of very different samples using an unfamiliar method. It may be worth factoring in an additional 10%-20% of extra reagents and plastic consumables for repeats in case they are needed, or even for backup reagents and spare consumables for time-critical work.
In conclusion:
Breaking down your PCR workflow into individual steps in a spreadsheet, and then itemising all of the reagents and consumables used in each step, can be a very useful way of:
- Managing the financial costs of PCR-based workflows
- Ensuring that you buy enough of each item to process a required number of samples
- Identifying the largest costs and potential savings opportunities
We’ve included several examples in this post of how this can be done using standard Bento Lab workflows and our reagents and consumables. Please feel free to modify these to reflect the specifics of your own protocols, and don’t forget to include any additional costs!
To get your own copy of the spreadsheet, just enter your email below and we will send it to you. (You will also get our free newsletter with tips for making PCR work in the field. Of course you can unsubscribe at any time!)
Get free PCR Workflow Budgeting Spreadsheets
And if you find this resource useful, or if you have any suggestions on how we can improve it and make it more useful for you, your students, or others, please let us know!
Please let us know what other resources, advice, and tips and tricks for using Bento Lab that you would like us to produce in the future!
Looking for advice on using Bento Lab?
Book a free consultation or ask a question.