Bird Sexing PCR Protocol

Abstract

What does this experiment test?

This protocol allows you to test for the sex of a bird by amplifying a region of the CHD1-Z and CHD1-W genes on the Z and W sex chromosomes, using the feather calamus (the base of the feather) of plucked feathers as a DNA source.

For most birds, the amplified gene regions from each chromosome will be of different length, resulting in a single length amplicon (amplified strand of DNA) for male birds (with ZZ chromosomes) and two amplicons of different length for female birds (ZW chromosomes). You can visualise these amplicons on an electrophoresis gel to determine the sex of the bird – a single band for males, and two bands for females. Two primer sets are included in this protocol because there is currently no single primer set that is effective for all bird species. Two primer sets (CHD1F/CHD1R and 2550F/2718R) should allow differentiation of sexes for most birds. However, some bird groups will not be able to be reliably sexed using these methods.

What are the genetics?

This project relies on the length of amplified DNA being different between the bird sex chromosomes W and Z.

Overview

W and Z bird sex chromosomes

This experiment targets the CHD1 (Chromodomain Helicase DNA Binding Protein 1) genes, which are present on the W and Z sex chromosomes of birds as two variants – CHD1-W (on the female-specific W chromosome) and CHD1-Z (present in males and females on the Z chromosome). These genes are homologous (almost identical in structure and function) but contain introns (DNA that is removed by RNA splicing before it is translated into mature RNA) that usually differ in length between sexes within a species and between species.

What are the possible results for this experiment?

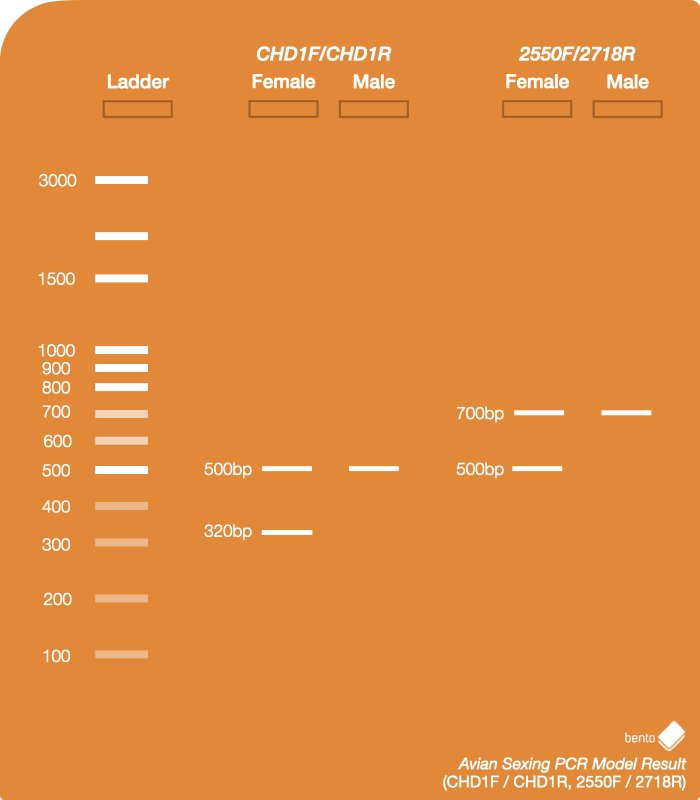
There are two possible results for most birds:

Female: One copy of the CHD1-Z gene is present on the Z chromosome, and one copy of the CHD1-W gene is present on the W chromosome. The target amplified regions of these genes are generally different in length and will be visible on an electrophoresis gel as two distinct bands.

Male: Two copies of the CHD1-Z gene are present – one on each of the Z chromosomes. The amplified regions of these genes are almost always identical in length and will be visible on an electrophoresis gel as a single band.

Exceptions to these results may occur and are detailed below.

False positives (detecting males as females)

a) Contamination from previously amplified female bird PCR products on pipettors, solutions, workspaces, tubes, or pen, may result in false positives. Any amplicons produced by the negative control are a sign of potential contamination. Good PCR lab practice should be undertaken to prevent contamination. See the “Good PCR lab practice” resource for more information.

b) Very rarely a male bird may possess two different variants of the CHD1-Z gene in its Z chromosomes (Z allele polymorphism) that can show as two bands (Dawson et al. 2001). Even more rarely two different variants can form a heteroduplex molecule (two mismatched single strands of DNA bound together in a double stranded molecule), resulting in a hybrid molecule that migrates more slowly through the gel than would be expected (Casey et al. 2009).

False negatives (detecting females as males)

a) Contamination from previously amplified PCR products from male bird samples may result in false negatives (see the section on false positives above).

b) Some bird species may have very similar sized introns in the target CHD1-Z and CHD1-W gene regions. Samples from these birds therefore produce two very similar sized amplicons for both regions, which may be visible as a single band even if the bird is female.

c) The primers may not be a good match for one of the target gene regions in females, e.g. in some Passerine birds using the 2550F/2718R primers (Fridolfsson & Ellegren 1999), or some Psittaciformes using the CHD1F/CHD1R primers (Çakmak et al. 2017).

d) Shorter amplicons may be preferentially amplified, resulting in only a single band being visible when run on an electrophoresis gel. However, it may still be possible to identify single band results as female if the size of expected amplicons is known when using CHD1F/CHD1R and 2550F/2718R primers, since the female specific female-specific CHD1-W region is smaller than the shared CHD1-Z region.

Because of the potential for false negatives and positive results (particularly females being identified as males), we recommend investigating the published literature to determine if anyone has previously used the CHD1 region to determine the sex of the bird species of interest; what primers worked best for that species; and the expected amplicon lengths for males and females.


Protocol

In this project, you will first extract DNA from plucked feathers. This will take about 20 minutes. After this, you will use PCR to amplify the CHD1-Z and CHD1-W gene regions. This will take about 3 hours, but most of it will be waiting time. Finally, you will visualise the results using gel electrophoresis, which will take about 1 hour.
At the end of each section, you can continue right away, or store your samples and continue later.


  1. DNA Extraction

    First, obtain the DNA sample using the DNA Extraction from Feathers protocol. It will take ~20 minutes, at the end of which you should have a clean DNA template sample in a PCR tube.

  2. PCR

    You will need your DNA extractions (1), an empty PCR tube (2), an empty 1.5 mL microcentrifuge tube, the primer mix for this project (3), Firepol master mix (4), and PCR grade water (5).

    The first step is to calculate how much PCR reaction mix you require for your samples.

    PCR reaction mix is the combination of Firepol master mix, primer mix and PCR grade water you will add to each PCR tube before adding your DNA extraction.

    For each sample, you will need:

    • 4 µL of Firepol master mix
    • 10 µL of PCR grade water
    • 2 µL of primer mix
    • 4 µL of DNA template

    You also need a negative control.

    A negative control is a PCR tube of PCR reaction mix that you do not add DNA to. This is used to check your PCR reaction mix is not contaminated.

    If you are doing multiple reactions using the same primers, you can first make a reaction mix containing all of the shared reagents. This means less pipetting, and you will use less pipette tips.

    To calculate how much of each reagents you will need:

    [number of DNA extractions] + [negative control] + 10%

    For example, if you have 9 samples from your DNA extractions:

    9 DNA extractions + 1 negative control + 10% = 11 repeats of PCR reagents

    • 11 x 4 µL = 44 µL of Firepol master mix
    • 11 x 10 µL = 110 µL of PCR grade water
    • 11 x 2 µL = 22 µL of primer mix

    In this example, you would use the 20-200 µL adjustable pipette to transfer the 44 µL of Firepol master mix, 110 µL of PCR grade water and 22 µL of primer mix into a 1.5 mL microcentrifuge tube. Make sure to use a fresh pipette tip each time.

    Close the lid of the 1.5 mL microcentrifuge tube and invert several times to ensure thorough mixing of your PCR reaction mix.

    If you are using a PCR reaction mix, set the 2-20 µL adjustable pipette to 16 µL and transfer 16 µL of PCR reaction mix into the required number of PCR tubes.

    If you are not using a PCR reaction mix, use a 2-20 µL adjustable pipette to add each item (4 µL of Firepol master mix, 10 µL of PCR grade water and 2 µL of primer mix) individually to the PCR tube.

    Use a permanent marker to label the PCR tubes with your sample names. Label the negative control too so you know not to add DNA to this PCR tube.

    Now add the DNA extraction. Set your micropipette to 4 μL.

    Using a fresh pipette tip, transfer 4 μL of your DNA extraction into the correspondingly labelled PCR tube containing PCR reaction mix. Then discard your tip.

    Make sure to keep your DNA extraction upright and pipette from the surface of the liquid.

    The DNA extractions contain PCR inhibitors that will prevent your PCR from being successful if the liquid is mixed.

    When you have pipetted the DNA extraction into the PCR tube, close the lid and invert the tube several times to ensure the DNA is mixed into the PCR reaction mix.

    Tap the PCR tube firmly on a hard surface to collect the liquid at the bottom and to ensure there are no air bubbles in the liquid.

    Place your PCR tubes in the thermocycler block.

    Set up the thermocycler with the following PCR program:

    In this step, you will use PCR to amplify the CHD1-Z and CHD1-W gene regions of variable lengths. You have a choice of two primer sets: CHD1F/CHD1R or 2550F/2718R.

    (For help setting up a touchdown PCR on your Bento Lab visit the PCR Thermocycler User Manual.)

    CHD1F/CHD1R primers

    • 5 mins at 95°C
    • 9 cycles made of 3 steps:
      • 30 sec at 94°C
      • 45 sec at 57-50°C (touchdown)
      • 45 sec at 72°C
    • 26 cycles made of 3 steps
      • 30 sec at 94°C
      • 45 sec at 50°C
      • 45 sec at 72°C
    • 5 mins at 72°C

    2550F/2718R primers

    • 5 mins at 95°C
    • 11 cycles made of 3 steps:
      • 30 sec at 94°C
      • 30 sec at 60-51°C (touchdown)
      • 30 sec at 72°C
    • 24 cycles made of 3 steps
      • 30 sec at 94°C
      • 30 sec at 50°C
      • 30 sec at 72°C
    • 5 mins at 72°C

    If you need help operating the Bento Lab thermocycler, check the manual. You can use the PCR  preset (1), then modify (2) the program to the required settings (3) before running the program (4).

    The program will run for ca 2 hours. When it is finished, you can keep the result in the freezer, or use it right away for gel electrophoresis.

  3. Gel Electrophoresis

    Follow the Gel Electrophoresis Protocol to cast a gel and run it with your PCR result, and a 100bp ladder. This should take about 1 hour.

  4. Visualising the Gel

    After the gel run has completed, you can visualise your results.

    Continue to wear gloves as you handle the gel.

    Open the orange lid of the gel box, and wipe off the condensation.  

    Gently pour out the buffer, and dispose of the buffer down a drain.

    Drain disposal of TBE running buffers is a standard waste disposal procedure followed by research labs. If you have questions, get in touch with us.

    Place the gel box onto the Bento Lab transilluminator surface. In order to get best visibility, you should do this in a room as dark as possible.

    Turn Bento Lab on, select the Gel Electrophoresis module, and turn on the Transilluminator light.

    Hold the orange filter lid over the gel to visualise the DNA bands. For documentation, use your mobile phone to take a clear picture of the gel. Rather than holding the lid over the gel, you can hold the lid directly in front of your camera lense.

    If the bands are faint, try to reduce the light in the room, e.g. by closing the curtains and turning off the lights.  You can also carefully take the gel out of the gel box and place it directly onto the transilluminator. Wear gloves when doing this, and be careful not to break the gel.

  5. Analysing your results

    Compare the picture of your gel to this example result, which has been run with all variations. Your sample should correspond to one of these variations.

    1 – Ladder – 100 bp DNA Ladder

    2 – Female chicken DNA using CHD1F/CHD1R primers – two distinct bands: one at ~320bp and one at ~500bp.

    3 – Male chicken DNA using CHD1F/CHD1R primers – one band at ~500bp.

    4 – Female chicken DNA using 2550F/2718R primers – two distinct bands: one at ~500bp and one at ~700bp.

    5 – Male chicken DNA using 2550F/2718R primers – one band at ~700bp.

    Your results – with either primer set, two bands indicate DNA is from a female bird and one band indicates DNA is from a male bird.

    After you have taken good photos of the gel for your documentation, you can dispose of the gel in your regular trash.

    Disposal of agarose gels is a standard waste disposal procedure followed by research labs. If you have questions, get in touch with us.

Welcome to our community.

Get our monthly biotech tips in your inbox, and we’ll send you a code for $10 off your next order.