Components and Physical Layout
The gel electrophoresis and transilluminator module is on the left side of the Bento Lab system.
The gel box is made up of two parts. The base 2 is made of clear acrylic. It is used to cast gels and as a gel tank during electrophoresis. It also stores buffer dams and combs for casting gels. The lid 1 is made of orange acrylic that functions as a filter for the blue light transilluminator. On the left side of the Bento Lab system 3, a red and black socket provides current for gel electrophoresis. The blue LED transilluminator 4 is located on the left side of the device.
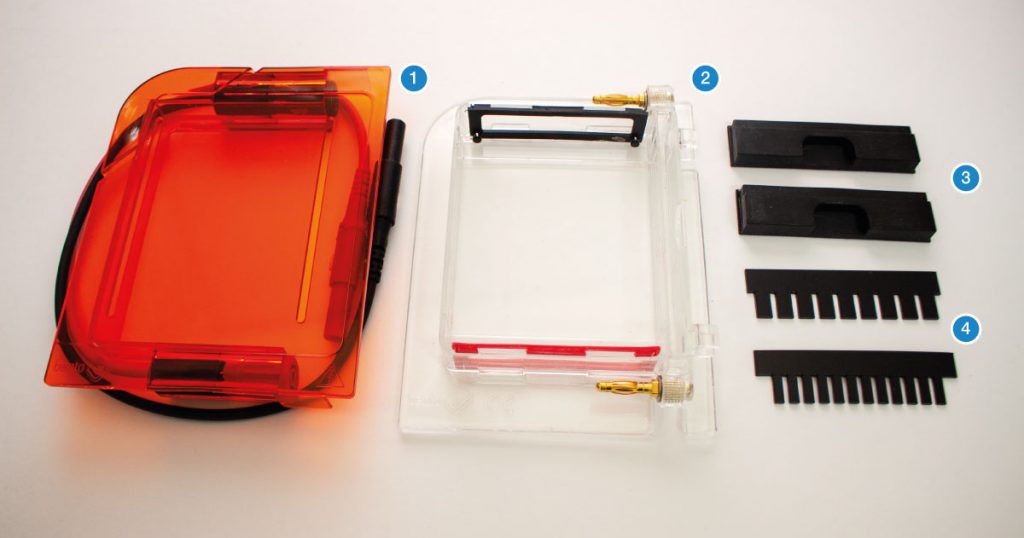
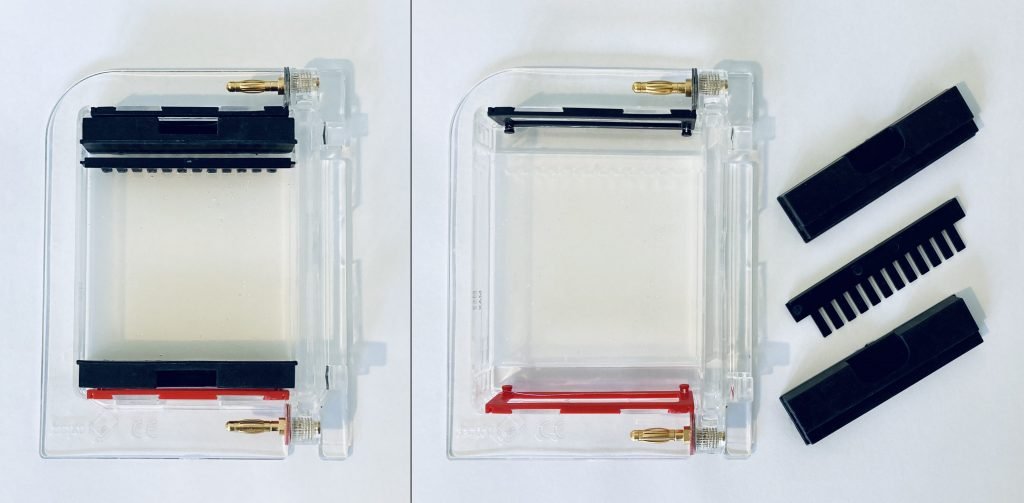
The gel box contains several parts, including the orange lid 1 and the gel tank 2, two dams used to create buffer zones during gel casting 3, and combs for 9 and 12 well gels 4.
Opening the gel box
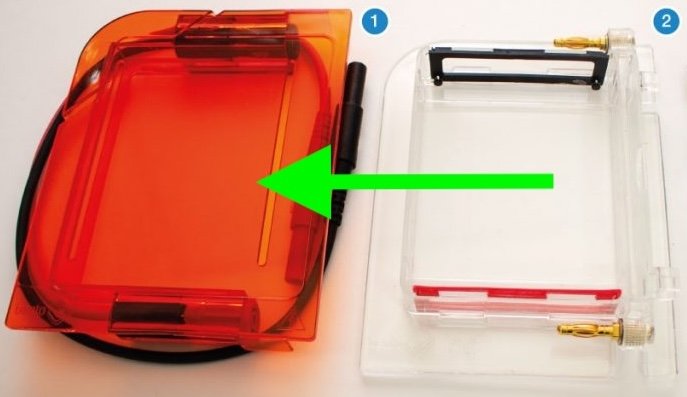
Compared to other gel boxes, the gel box has a novel opening mechanism: the lid slide opens.
To open the gel box, slide the orange lid away from the gel tank.
Specifications
| Bento Lab Entry | Bento Lab Pro | |
|---|---|---|
| Voltage | Fixed: 50V | Variable: 30 – 120 V |
| Transilluminator | 470 nm blue light and diffuser | |
| Viewing Window | 91 × 78 mm | |
| Optical Filter | Amber acrylic | |
User Interface
To use the Gel Electrophoresis and Transilluminator module, select it from the home screen.
To set the voltage of a gel, first select the voltage button. Push down the orange click-wheel and keep holding it down while rotating it to change the value. Dial clockwise to increase the voltage, and counter-clockwise to decrease it.
To start running the gel at the selected voltage, press the timer button. On the next screen, set the timer. To change the duration, push down the orange click-wheel and keep holding it down while rotating it to change the value. Dial clockwise to increase the duration, and counter-clockwise to decrease it.
Make sure your gel is ready and connected to Bento Lab before hitting the confirm button.
If Bento Lab does not detect a current draw, or if the current draw is too high, an error message will be displayed. If no current is detected, despite the gel box being connected, this might indicate a disconnect of the electrode wires or a broken platinum wire.
When the gel is running, the remaining time is displayed on top right 1, and a flashing lightning bolt indicates that current is flowing 2. The clock button 3 allows for the timer to be adjusted, and the cancel button 4 can be used to turn off the power to the gel.
When the gel has finished running, either:
- (without dark box) unplug the gel tank and place it carefully on top of transilluminator, or
- (with dark box) unplug the gel tank, carefully remove the orange lid and place the gel tank (containing the gel and TBE buffer) on top of the transilluminator and place the dark box over it.
Select the light bulb button and press the orange click-dial to toggle the transilluminator on and off. The gel can be viewed safely through the orange lid or orange eye hole on top of the dark box.
Warning: When the transilluminator is on, do not stare directly into the blue light for prolonged periods of time.
The light intensity can also be modulated by holding the click-dial down and rotating it.
Using a mini gel system
For best results, we recommend running gels at 50V using 0.5X TBE.
In mini gel systems like Bento Lab, the electrodes are closer together than in larger gel tanks, meaning the same applied voltage results in a higher voltage gradient.
This causes DNA to migrate faster but can also lead to issues like:
- Band streaking or smearing – If the voltage is too high, DNA may move too quickly, causing diffusion and distortion.
- Excessive heat generation – Higher gradients can overheat the gel, impacting separation quality.
To avoid these problems, it’s important to adjust the voltage appropriately for mini gels.
Casting a gel
All Bento Lab protocols use 0.5X TBE buffer in the gel electrophoresis step. We recommend preparing a stock solution of 0.5X TBE buffer by adding 50 mL of 10X TBE buffer to 950 mL of deionised or distilled water in a glass or plastic bottle. Bottled water or good quality tap water can also be used if distilled/deionised water is unavailable.
- Pour out the required amount of 0.5X TBE buffer into a microwaveable container and add agarose tablet(s) according to the protocol you are following. For a 1% gel add 1 tablet to 50 mL of buffer (1.5% gel is 1 tablet in 33 mL buffer; 2% gel is 2 tablets in 50 mL buffer; 3% gel is 2 tablets in 33 mL buffer.)*
- Wait a minute or so until the tablet has disintegrated, then heat the solution in a microwave at full power for short bursts of 20-30 seconds. Swirl the solution in between bursts to mix, until the agarose is completely dissolved. It should be completely clear with no traces of any particles (incompletely melted agarose will result in poor amplicon visualisation). If particles are present then microwave briefly again until the agarose is clear. Avoid overboiling the mixture, as the buffer will evaporate and your gel will have a higher concentration of salts than the running buffer (which may cause poor migration and overheating). Alternatively, for best results weigh the beaker and buffer before microwaving, bring it to bubbling two or three times, weigh again to determine the evaporation loss, and add the lost weight in distilled water.
- Check you are working on a level surface to cast a gel with uniform thickness.
- Gently slide the orange lid off the gel tank.
- Place the buffer dams in the tank to cover the buffer zones around the electrodes. Wetting the dams with tap water before inserting them can help provide a better seal.
- Select a comb and insert the comb into the holder.
- Once the agarose has cooled to about 55°C, it should feel hot, but not too hot to touch. At this point add the recommended volume of DNA stain (this will depend on the type of DNA stain you use) and swirl gently to mix. For GelGreen®, 1 μL per 10 mL of TBE buffer is recommended, but as little as 0.5 μL per 10 mL can also produce good results and save on costs. Then carefully pour the melted gel into the gel tank.
- Check the agarose gel for bubbles. If any bubbles are present, these can be popped or drawn to the bottom of the gel with a pipette tip.
- Allow the gel to cool down and solidify. This takes up to 30 min at room temperature, or 15 min in a cool room or a fridge, depending on the gel thickness.
- Gently remove the bottom dam first and make sure that the gel is completely set and has left a sharp edge. If it hasn’t fully set then wait another 5-10 minutes. Then remove the top dam and comb.
- Inspect the gel for integrity. The gel should have sharp edges at the top and bottom, and the wells should be well-formed. In the rare occurrence that there has been a leak due to a dam not being securely fitted, a thin film of agarose may have set between the gel and the electrode. This can be carefully cut and removed with a pipette tip, taking care not to damage the electrode.
Running a gel
- Pour the 0.5X TBE buffer solution into the gel tank over your prepared gel until the liquid covers your gel, and the level is at least 2-3 mm above your gel. Be careful not to fill the tank above the MAX fill line as this may increase the risk of spillage. You can expect to use up to 50 mL of 0.5X TBE for a 25 mL gel, 40 mL for a 33 mL gel, and 30 mL of 0.5X TBE for a 50 mL gel.
- Carefully load a molecular weight ladder into the first lane of the gel.
- Load your samples into the remaining wells of the gel.
- Gently slid the orange lid onto the gel tank until it clicks shut.
- Place the gel tank on a level surface beside or on the Bento Lab transilluminator.
- Set the voltage to the desired electrophoresis voltage for your protocol. To make changes to the voltage, select the voltage value button. Push down the orange click-wheel and hold down whilst rotating to change the value. Dial clockwise to increase the voltage, and counter-clockwise to decrease. Release the orange click-wheel once you have reached the desired voltage.
- Set the desired time by selecting the time value, pushing down and rotating the orange click-wheel.
- Confirm your settings by clicking on the tick on the right, and set the gel to run.
- Run the gel until the dye line has travelled down the desired length of the gel. A typical run time with Bento Lab is about 30-45 minutes, depending on the gel concentration and voltage, but up to 1.5 hrs may be required for some applications.
- Wait until the run has finished, or cancel the run. Disconnect the electrodes from the power source.
- If you are visualising using the Gel Imaging Hood, remove the gel tank lid and place your gel tank on the transilluminator, and then fit the Gel Imaging Hood over the tank. Then select the transilluminator button to turn the blue light on, and visualise your bands with a smartphone through the orange filter at the top of the Gel Imaging Hood. Bands can also be visualised through the orange gel tank lid in a dark room.
General questions
How much running buffer do I need?
We recommend using 50 mL of running buffer per gel as a general guideline. Be careful not to fill the tank above the MAX fill line as this may increase the risk of spillage.
The amount of buffer needed depends on the size of your gel. If you pour a 25 mL agarose gel you will need around 40 mL of running buffer to cover the gel, whereas a 50 mL gel will need around 30 mL of running buffer.
What percentage of agarose should I use?
All our protocols recommend which percentage agarose gel to use to give the best visualisation of the PCR amplicons expected from the experiment.
The greater the percentage of agarose, the smaller the fragment of DNA that can be resolved. The appropriate percent agarose gel depends on the size of the DNA fragment that you will be running on the gel. You will obtain good resolution of larger DNA fragments (5-7kb) with a 1% agarose gel, whereas for good resolution of small PCR products, you will need a higher percent gel such as a 1.5% or 2% agarose.
| DNA size resolution | Percent agarose gel | Agarose tablet(s) in 0.5X TBE buffer |
| 1-30 kb | 0.5% | 1 tablet per 100 mL |
| 800 bp – 12 kb | 0.7% | 1 tablet per 71 mL |
| 500 bp – 10 kb | 1.0% | 1 tablet per 50 mL |
| 400 bp – 7 kb | 1.2% | 1 tablet per 42 mL |
| 200 bp – 3 kb | 1.5% | 1 tablet per 33 mL |
| 50 bp – 2 kb | 2.0% | 2 tablets per 50 mL |
| 30 bp – 1 kb | 3% | 2 tablets per 33 mL |
How can I clean and decontaminate the gel box?
After use, the gel box can be a potential source of PCR product contamination because the PCR products loaded into the gel contain very highly amplified DNA, and some of it may have escaped into the running buffer, or remain on the plastic surfaces after the buffer is poured away.
To decontaminate the gel box thoroughly, spray or wipe the surfaces with diluted domestic bleach (1 part in 10, with a droplet of detergent to aid wetting) and let it sit for 5-10 minutes, before rinsing the bleach off with water. For more advice on decontamination, consult our guide here.
DO NOT expose the gel box surfaces to any solvents (including alcohols), or harsh acidic or alkali solutions. Like most electrophoresis gel boxes, the Bento Lab gel box is made from acrylic plastic, and exposure to harsh chemicals may cause stress fractures or other damage.