Lichen DNA Barcoding – From Sample to PCR product

Overview

Lichens are an essential component of global, national, and local biodiversity, but they can be difficult to identify to species level using morphology alone.

DNA barcoding is one approach to help improve identification of lichens. DNA barcoding is a method of using species-diagnostic regions of DNA known as DNA barcodes to characterise and identify organisms.

By extracting DNA, amplifying with PCR, and DNA sequencing DNA barcode regions, you can produce a DNA barcode that should be characteristic of that specimen. A specimen can then in theory (if not always in practice) be identified by using its DNA alone by comparison with reference databases of authenticated specimens, assuming that it has been previously barcoded.

The process of DNA barcoding lichens is very similar to that of other organisms, but there are some key differences involving:

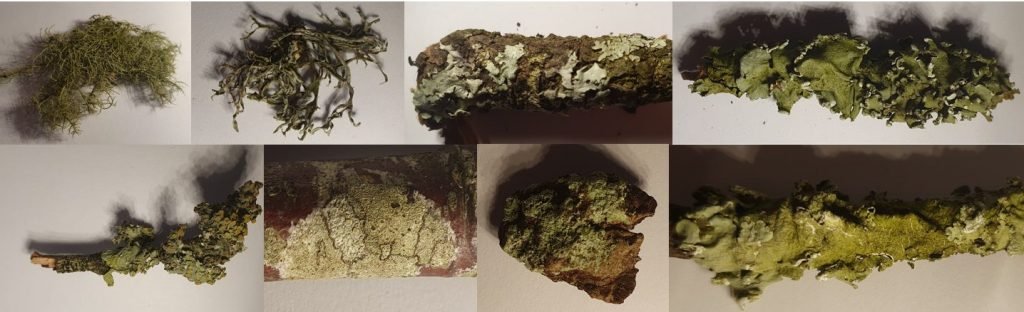
  • How to sample the material
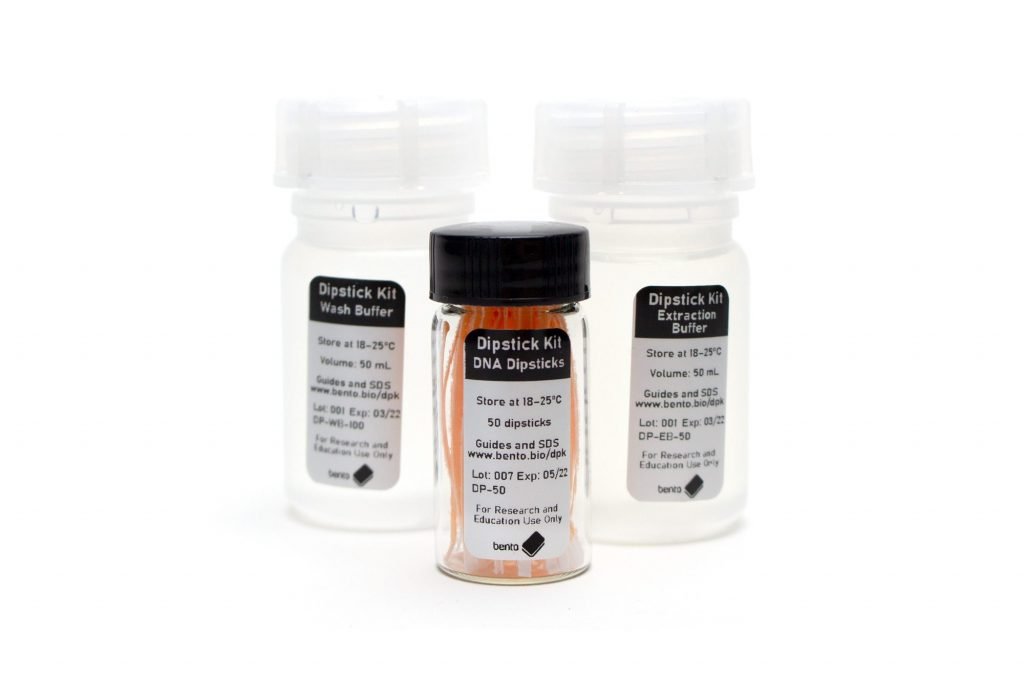
  • How to extract the DNA
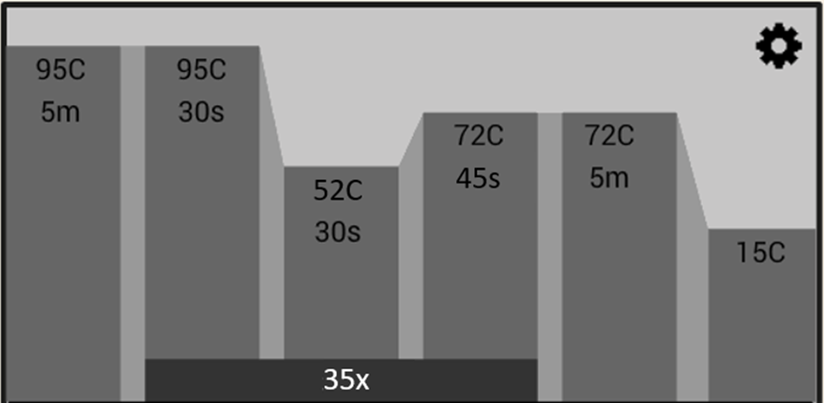
  • What primers to use to amplify the DNA for particular groups of lichens
  • What can be expected with in terms of DNA barcode reference library completeness

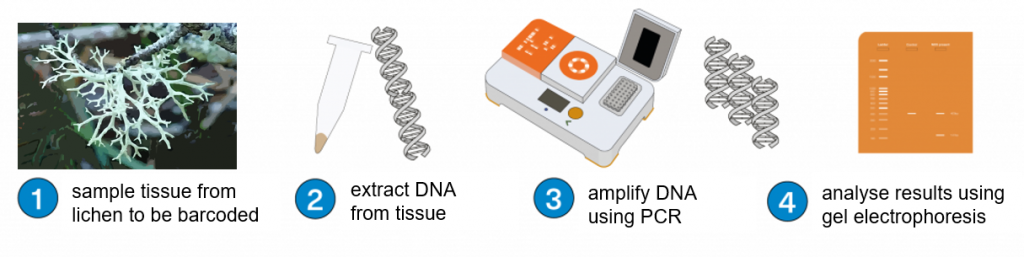
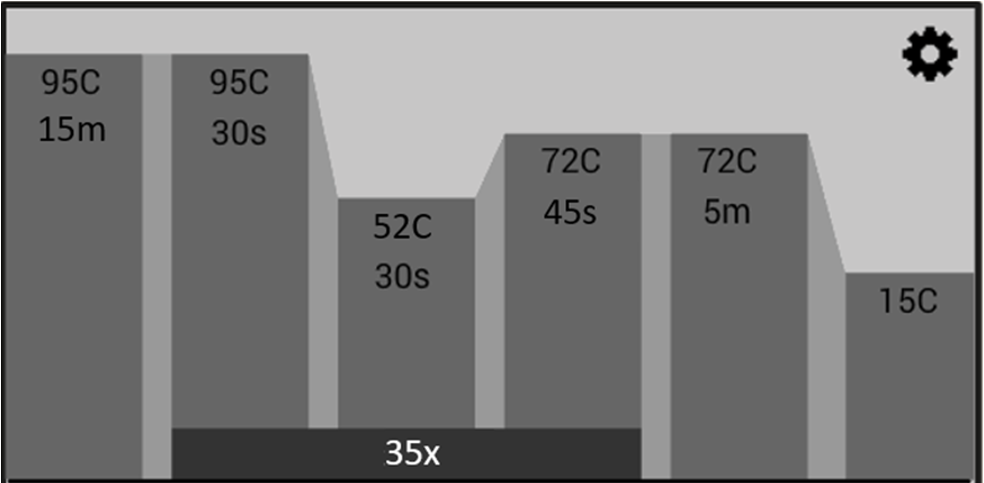
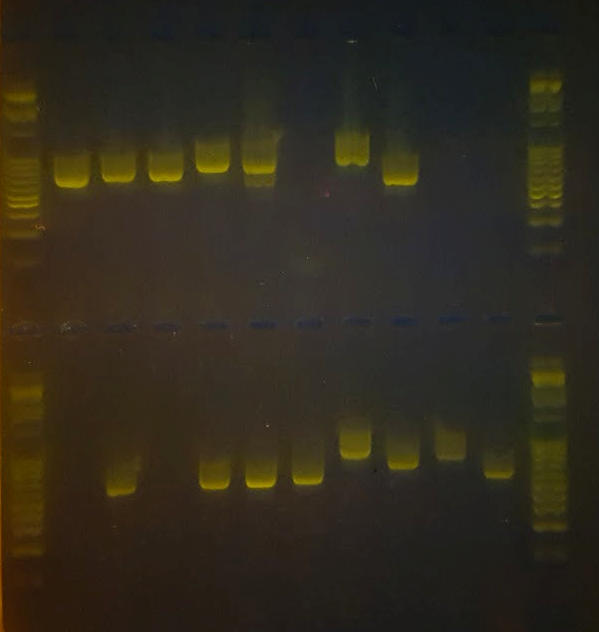
This workflow will take you from sampling your lichen specimens, to DNA extraction, PCR, and examination of your PCR products before sending them off for DNA sequencing.

This resource was produced to support the British Lichen Society and their members in their future DNA barcoding work. We hope it will also be useful to lichenologists and nature lovers everywhere!

Learn more about DNA barcoding

DNA barcoding is the use of a DNA sequence (a text string of letters of A, G, T, C representing the nucleotides adenine, guanine, thymine, or cytosine) of a species-diagnostic region of DNA to characterise and identify organisms. The species-specific region is called a DNA barcode region, and the DNA sequence is called a DNA barcode.

The idea is that for all organisms there will be regions of DNA which have very high similarity between individuals within a species, but have clear variation between species – this separation is known as a barcoding gap.

Many different DNA barcode regions have been proposed and used for different organisms. For lichens and fungi the Internal Transcribed Spacer (ITS) region is the most commonly used barcoding region.

DNA barcodes for a specimen can be produced by extracting its DNA, amplifying the DNA barcode region, and DNA sequencing it. The resulting sequence can be used to characterise the specimen (i.e. Specimen X has Barcode Y) and then identify it by comparison to reference DNA barcode databases of authenticated well-identified organisms (i.e. Specimen X has Barcode Y, and Barcode Y matches that of Species Z, so Specimen X is Species Z).

Researchers usually include more rigorous criteria to deciding when a species has been formally barcoded when done as part of a DNA barcoding process. These can include:

  • Determination of the collections by taxonomic experts rather than just collectors
  • Sequencing at least three specimens with identical morphological IDs and DNA barcodes to ensure that a species barcode is correct
  • Applying a minimum standard of sequence length and quality for a DNA barcode

As with most scientific methods this process works well generally, but there are challenges and complications for many cases. However, these are best treated when encountered during sequence analysis and interpretation.

This workflow of lichen sampling, DNA extraction, PCR, and gel electrophoresis shows how to get from a lichen sample to a PCR product that can then be sent off for sequencing.

Subscribe to our mailing list for regular updates

Lichen DNA barcoding protocol – from sample to PCR product

What will you need for this protocol?

Reagents

Consumables

Equipment

Guide

  1. Familiarise yourself with the core skills needed

    Before you start, it will be useful to learn about the basic core skills you will be using as part of this workflow.

    The workflow in this guide will be slightly different to those in the above tutorials. If in doubt you should follow the processes described in this guide.

  2. Decide on your sample selection

    During your first lichen DNA barcoding experiment, it is useful to:

    • Gain hands-on experience with the workflows
    • Make sure that they work for you and your samples
    • Obtain a sample that works well to use as a positive control for future use.

    To do this it is useful to begin with a practice set of larger recently collected (fresh) well-characterised common species of lichens.

    Once you are comfortable with the process, sample selection can be driven by your research needs or interests. Suggested priorities could include:

    • Species that are interesting, rare or of conservation importance
    • Species lacking reference sequences in publicly accessible databases
    • Mystery species
    • Morphologically cryptic species
    • Potential species pairs that differ in reproducing vegetatively or sexually

    If you have already done a successful lichen DNA extraction and PCR, consider including one of your successful samples as a positive control. This will help you troubleshoot the cause of failure if all of your samples fail in a later batch.

    Once you have decided on your sample selection for DNA barcoding, you should make a list of these samples in your lab workbook.

  3. How should I label and store my specimens?

    Labelling and storing specimens correctly are essential parts of the lichen recording and DNA barcoding process. Advice on how to make lichen vouchers and store them long-term can be found from the British Lichen Society’s resources on vouchering lichens.

    The following suggestions are a brief summary:

    • Each lichen specimen should be stored in a folded paper packet labelled with the collection information, e.g. collection code, date, collector, location, substratum, National Grid Reference or latitude/longitude, and any notes.
    • For long term storage voucher specimens should be dried thoroughly at a low temperature, sealed in bags and frozen to kill insects.

    Additionally, for DNA barcoding, where the substrate (e.g. a twig) in the packet contains multiple species you should clearly indicate which lichen colony is the species of interest to be sampled.

    Once selected for DNA barcoding, give each collection packet a simple and unique code for your workflows (e.g. your initials, date, and a number, AB_2023.04.02_03) and make sure to note the species down in a list in a lab book in a detailed and dated entry.

    Why do I need a positive and negative control?

    Positive and negative controls are essential parts of PCR troubleshooting. While these may not seem necessary when all is going well, they are invaluable if your samples fail to amplify or if you have unexpected multiple bands in some samples.

    A positive control is a sample which you know will work. This could be a sample which you previously extracted and amplified DNA from (controlling for the whole extraction and PCR process), or a known working DNA extract (controlling just for PCR). If your samples fail to amplify but your positive control sample works, then you know the extraction and PCR process works. If your samples and positive control sample fail, you can then use a positive control extract to see if it is an extract problem or a PCR problem.

    A negative control is a blank PCR which should produce no amplified DNA (though it may produce primer dimers). This is useful to identify contamination coming from your PCR mix or other sources in case you have unexpected bands in your PCR of some samples. You can have multiple different negative controls, ranging from a simple blank PCR to a full DNA extraction and PCR negative control.

  4. Decide on the DNA extraction method for each sample

    The choice of DNA extraction method is partly determined by the sample type, size, condition, and species of interest. It can be useful to decide this before starting sampling so you can organise your samples and your workflows.

    Here we suggest two approaches to lichen DNA extraction that you can use side by side:

    Direct PCR

    Direct PCR involves putting a very tiny piece of lichen material directly into a PCR mix and running the PCR. We recommend this method for very small recently collected samples, but it does requires a dissecting microscope and good hand/eye coordination.

    Dipstick DNA Extraction Kit

    The Dipstick DNA Extraction Kit is a quick and reliable method that works well with most small to larger lichens tested so far, including some older samples. The Dipstick protocol can be adapted easily to use very small volumes of Extraction Buffer (40 µL minimum) for tiny amounts of tissue, to larger volumes (200 µL) for larger amounts of tissue. We recommend trying this method for all lichen samples from 1 mm diameter upwards. This product can be found here.

    Once you have decided on your protocol, organise samples by DNA extraction method and write down the methods to be used in your lab book against your sample names.

  5. How Does Direct PCR work?

    Direct PCR involves adding tissue directly in a PCR mix. During the initial denaturing cycle sufficient DNA should be released to act as a DNA template for PCR. The amount of tissue should be extremely small so that it doesn’t inhibit the PCR reaction.

    This method works best for fresh/recent material, with extremely small amounts of tissue (sampled under a dissecting microscope), and with a recommended extra 10 minutes of initial denaturing at the start of the PCR cycle.

    How does the Dipstick DNA Extraction Kit work?

    The Dipstick DNA Extraction Kit works as follows:

    • DNA is released from cells by physical disruption, detergents, and osmotic pressure from salts, allowing it to escape into a stabilising buffer containing EDTA (a chelating agent that inhibits enzyme activity), and Tris-HCl (a pH buffer).
    • When a dipstick is dipped into this solution, DNA can bind onto the exposed cellulose end of the dipstick.
    • Dipping the dipstick into a wash step removes any residual tissue fragments and most PCR inhibitors.
    • Dipping the dipstick into the PCR mix releases a very small amount of clean DNA than can be amplified by PCR.

    While this method can be used without a dissecting microscope, using a microscope is helpful especially when working with smaller lichens.

    It may be useful to note that older material is likely to contain smaller amounts of DNA suitable for PCR and so larger amounts of tissue and Extraction Buffer may be needed.

  6. Sample your lichens into the appropriate tubes for Direct PCR or Dipstick extraction

    For each sample, dissect and transfer an appropriate amount of tissue into either:

    • A labelled 0.2 µL PCR tube for Direct PCR. This method will use the smallest amount of clean lichen tissue you can cut under a dissecting microscopy, and ideally from a fungal fruiting body such as an apothecium or perithecium if any are present. You should make sure that no other material gets into the PCR tube. Once sampled, keep these tubes separate to others to avoid confusion.
    • A labelled 1.5 mL centrifuge tube for Dipstick extraction. This approach can cope with very small amounts of tissue of less than a mm diameter, to tissue of around 2-3 mm diameter.

    Once your samples are put into your tubes, arrange your labelled tubes in order, in either the Bento Lab rack, another rack, or on a clean piece of paper.

    Keep your Direct PCR tubes separate from the others to avoid confusion.

    For Dipstick extraction, the amount of tissue should be large enough to be homogenised (broken up into a slurry) with a plastic pestle, and also large enough to be initially visible with the naked eye so that you can see when it has been ground up. However, it should also be small enough that the slurry suspension is quite dilute before extraction to minimise PCR inhibitor carryover.

  7. Suggestions for sampling

    Be aware that some lichens will greatly increase in size when rehydrated ,and it may be better to use smaller samples of such species.

    Work on a clean sheet of paper for each specimen to avoid cross-contamination.

    Avoid touching specimens where possible. Cross contamination isn’t a major issue but could be a concern with some powdery lichens.

    Tissue can be cut and transferred into the mouth of the tube using the edge of a new half double edged razor blade (these can be broken apart in the packet and a half used for each specimen). Once inside, the tissue can be settled into the bottom of the tube by tapping or flicking the closed tube. Alternatively a fine scalpel, tweezers or a needle could be used to transfer the tissue, but these should be cleaned and sterilised between each use with a 10% dilution of thin domestic bleach.

  8. Add Dipstick Extraction Buffer to the samples in 1.5 mL tubes

    For each sample to be extracted using the Dipstick DNA Extraction Kit you will need to add an appropriate amount of Extraction Buffer. The appropriate amount of buffer to use will vary depending on the size of the sample in the tube.

    • For extremely tiny (just barely visible) samples use 40 µL — this is the minimum amount of Extraction Buffer you can easily use for homogenisation. Using less buffer will mean your DNA extract is more concentrated — this can be very useful when samples are extremely small.
    • For larger samples use between 100–200 µL of Extraction Buffer initially — smaller volumes may aid with efficient homogenisation. You can always add more later if needed.

    Use the 200 µL pipette to dispense these volumes into each tube. You can change the volume that the pipette transfers by rotating the pipetting button. However, avoid dialling the pipette beyond its limit of 200 µL.

    You can use the same pipette tip for each tube provided you dispense without touching the tube or the sample. If you do touch anything with the tip, remove it and use a new tip.

  9. Homogenise your samples for Dipstick Extraction

    For each sample, one at a time, grind the tissue until it is completely broken apart into small fragments in suspension. One way of doing this is to trap the tissue between the side of the pestle and the tube wall and twisting the pestle. Avoid trapping the tissue at the very bottom of the tube as it may become difficult to dislodge.

    Once the tissue is thoroughly homogenised, examine it and assess how cloudy the solution is. If it is very cloudy then add more lysis buffer, from between 200 µL to 500 µL.

    The homogenised samples can be left at room temperature while you start the next steps.

    You are now ready to prepare your PCR mix.

    Avoid adding too much Extraction Buffer routinely as this may reduce the number of extractions you can do with each extraction kit. It is better to add smaller volumes of tissue to avoid waste and unnecessary cost.

  10. Make up your PCR mix

    Get your reagents ready and defrosted

    Before preparing, set out your reagents in a row in a rack, with the largest volumes to be used first. Give them enough time to defrost before using them.

    You will need:

    • PCR grade water
    • 5x FIREPol® Ready-To-Load Mastermix
    • Bovine Serum Albumin 20 mg/mL (optional)
    • Fungal ITS1F/ITS4 primer mix (or individual forward and reverse primers)

    Decide on your PCR mix formula

    Three different formulas of PCR mix are described below, to allow use of this protocol by those with different PCR reagents:

    • A very basic PCR mix using just 5x Mastermix, PCR grade water, a Bento primer mix, and DNA template.
    • A PCR mix using the PCR additive Bovine Serum Albumin (BSA) which can help with amplification from difficult DNA sources.
    • A PCR mix using BSA and also using individual primers at 10 uM concentration.

    Decide on the number of PCRs you want to do.

    It may be easiest to always do one of the following:

    • 10 PCRs (8 samples plus negative and positive controls) for one row in one gel
    • 18 PCRs (16 samples plus negative and positive controls) for two rows in one gel
    • 32 PCRs (30 samples plus negative and positive controls) for four rows over two gels.

    Make up the 1x Mastermix

    • Label a 1.5 mL tube with MM for “Mastermix”.
    • Use the tables below to add the appropriate amount of each reagent to this tube, depending on how many PCRs you are doing.

    Take care with pipetting:

    • Always double check your pipette volumes before pipetting
    • Tick off each reagent as you go
    • Always add the larger volumes first and mix with a pipette tip at each step
    • Round volumes to the nearest convenient unit for the pipette you are using

    PCR Mix 1: 5x FIREPol® Mastermix Ready-To-Load using Bento Lab Barcoding Primers

    1x Master Mix with Bento Primer Mix1 rxn10 rxns +10%20 rxns +10%32 rxns +10%
    PCR Grade Water14154308492.8
    5x Mastermix44488140.8
    Bento Primer Mix2224470.4
    TOTAL20220440704

    PCR Mix 2: 5x FIREPol® Mastermix Ready-To-Load using Bento Lab Barcoding Primers and BSA

    1x Master Mix using BSA and Bento Primer Mix1 rxn10 rxns +10%20 rxns +10%32 rxns +10%
    PCR Grade Water11123246393.6
    5x Mastermix44488140.8
    BSA 20 mg/mL33366105.6
    Bento Primer Mix2244876.8
    TOTAL20220440704

    PCR Mix 3: 5x FIREPol® Mastermix Ready-To-Load using 10 uM primers and BSA

    1x Master Mix using BSA and 10 uM Primers1 rxn10 rxns +10%20 rxns +10%32 rxns +10%
    PCR Grade Water12.2134.2268.4429.44
    5x Mastermix44488140.8
    BSA (20 mg/mL)33363105.6
    Forward primer (ITS1F) 10 µM0.44.48.814.08
    Reverse primer (ITS4) 10 µM0.44.48.814.08
    TOTAL20220440704

    Once you have made up your PCR mix, pipette 20 µL of PCR mix into:

    • Each PCR tube for Dipstick DNA Extractions.
    • Each direct PCR tube, making sure that the tiny fragment of tissue is floating in the PCR mix. If it isn’t you can use a pipette tip to force it to the bottom of the tube.

    If you have a lot of Dipstick Extractions to do and are working slowly, consider keeping the PCR mix and tubes cold or on ice to reduce the chance of forming primer dimers or non-specific amplification.

    You can use the same pipette tip for pipetting the PCR mix into each tube provided you don’t touch anything. If you do, discard the tip and use a new one.

  11. What is BSA and how do I make a BSA solution?

    BSA or Bovine Serum Albumin is a purified protein that is often used in PCR as an additive. It is thought to functions in several roles:

    • As a blocker to bind to the surface of plastic tubes, reducing the binding of DNA to these surfaces
    • As a blocker to bind to some PCR inhibitors, reducing the binding of DNA and polymerase to these molecules
    • As a protectant to reduce polymerase degradation during thermocycling.

    BSA can be bought either as a PCR-grade reagent in solution, or as a lyophilised crystalline powder which needs to be dissolved and filter-sterilised before use.

    It is typically made up in concentrations around 20 mg/mL, and used with final concentrations in PCR between 0.5 µg/µL and 3 µg/uL.

    Once in solution, as a protein solution it can be vulnerable to colonisation by microbial contaminants, and so can be a source of PCR contamination unless kept frozen and on ice.

    To make it up from lyophilised power, weigh out 20 mg on a microgram scale, and dissolve in 1 mL of PCR grade water. Then draw up this solution into a sterile 1 mL syringe, affix a sterile 0.2 µM syringe filter on the tip, and dispense into a sterile tube. This solution should then be kept frozen between uses or discarded if kept at room temperature for too long.

  12. Prepare the Wash buffer

    Prepare a 1.5 mL Wash Buffer tube for each sample to be extracted using the Dipstick DNA Extraction Kit.

    Pipette 750 µL of Wash Buffer into each tube using a 1000 µL pipette.

    The wash tubes don’t need to be labelled as they will be immediately be discarded after use, but can be marked with a W (for Wash) if that is useful to avoid confusion.

  13. Extract lichen DNA into the PCR mix using the Dipstick DNA Extraction Kit

    Remove the required number of Dipsticks from the Dipstick tube and place on a clean surface (for example on a clean sheet of printer paper or aluminium foil.

    Arrange your tubes in order of homogenised sample (at the back), Wash Buffer, and PCR tubes (at the front).

    For each sample to be extracted:

    • Open all three tubes (extract, wash tube, and PCR tube)
    • Dip a dipstick into the extract tube three times, making sure that the tip of the dipstick is fully immersed in the extract solution.
    • Dip the dipstick in the wash tube three times to remove the Extraction Buffer, any fragments of tissue, or contaminants. Wipe the edge of the dipstick against the tip of the tube to remove any remaining liquid.
    • Dip the dipstick three times in the PCR mix, pushing the tip through the liquid but not enough to break the tip of the dipstick. When removing, wipe off any droplets against the side of the tube.
    • Close all the tubes.
    • Discard the wash buffer.

    Additional dips can be used but have little impact on the end result.

  14. Run the PCR programme

    The background and basic protocol for PCR with Bento Lab can be found here. Please note that some of the specifics will be different to those stated in the guide.

    The Bento Lab thermocycler should be run with the following settings for ITS1F and ITS4 primers:

    Dipstick Extraction PCR:

    • 5 min at 95 C (initial DNA denaturing step)
    • 35 cycles of:
      • 30s at 95 C (DNA denaturing step)
      • 30s at 52 C (primer annealing step)
      • 45s at 72 C (polymerase extension step)
    • Final extension: 5 min at 72 C (final polymerase extension step)
    • Hold at room temperature.

    Direct PCR

    • 15 min at 95 C (initial DNA denaturing step)
    • 35 cycles of:
      • 30s at 95 C (DNA denaturing step)
      • 30s at 52 C (primer annealing step)
      • 45s at 72 C (polymerase extension step)
    • Final extension: 5 min at 72 C (final polymerase extension step)
    • Hold at room temperature.

    The PCR should take around 2 hrs 15 minutes or 2 hrs 25 minutes to complete depending on protocol used.

    If you are amplifying only from Dipstick Extraction, use the Dipstick Extraction PCR protocol — this will save you 10 minutes.

    If you are amplifying a mix of samples for Direct PCR and Dipstick Extraction, or only Direct PCR samples, use the Direct PCR protocol — it is the same as the Dipstick Extraction PCR protocol except with an extra 10 minutes initial denaturing time to improve the release of DNA from cells.

    While the PCR is running you should make up the agarose gel for electrophoresis.

  15. Make a 1.5x agarose gel

    The basic protocol for gel electrophoresis can be found here.

    To visualise the expected amplicon sizes of 600 bp–1000 bp, we recommend using a 1.5% agarose gel in 0.5X TBE buffer. An ~1.5% agarose gel can be made from one 0.5 g agarose tablet in 33 ml of 0.5x TBE buffer.

    Melt the agarose

    • Place one 0.5 g agarose tablet in a beaker or microwave-proof container such as a clean empty jam jar.
    • Measure 33 mL of 0.5X TBE into a 50 mL centrifuge tube or measuring cylinder, using the graduations on the side, and then pour into the beaker.
    • Wait until the agarose tablet has completely disintegrated into powder.
    • Microwave for around 20 seconds, and check if the agarose solution is bubbling. If it isn’t, microwave for another 20 seconds. As soon as it is bubbling, take it out carefully (holding the top of the beaker) and give it a swirl. Put it back into the microwave and run for another 10 seconds until bubbling again. At this point it should be clear. If it is still hazy microwave again for 10 seconds until clear.
    • Allow the beaker to cool slightly while you set up the Bento Lab gel tray.

    Set up the Bento Lab Gel Tray

    • Place the two rubber dams at the front and back of the tray.
    • Check that the surface you will be setting the gel on is level (you can use a spirit level app on a smartphone for this), and that it can be left undisturbed while setting.

    Add the DNA stain and pour

    • While the beaker is still somewhat hot to the touch, add 2 µL (or 1.75 if you have a 10 uL pipette) of GelGreen DNA stain to the beaker and swirl it gently to disperse it, being careful not to introduce bubbles. Allow it to cool a little more and for any bubbles to rise to the surface.
    • Pour the molten agarose slowly into the gel tray.
    • Inspect the gel for bubbles – if there are bubbles then you can use a pipette tip to move them down to the bottom side of the tray (away from the combs).
    • Insert the comb/s, making sure they are parallel to the tray and spaced appropriately.
    • Place a paper towel over the gel tray to allow the gel to set. If it is in bright light then consider covering it with a dark box. It should take around 20-30 minutes to set.

    Remove dams and add running buffer

    • When the gel has set, first remove the bottom-most rubber dam — a poor set at the bottom won’t affect the quality of the gel. Once you have confirmed that the gel is set, remove the combs and top dam.
    • Inspect the electrodes — if the dams are not fitted tightly then agarose can leak over them. Remove any such agarose with a pipette tip, being careful not to damage the electrode.
    • Carefully pour around 40 ml of 0.5X TBE buffer over the gel – sufficient to cover the gel.

    You are now ready to load your PCR products.

  16. Load your PCR products

    Make a gel map

    Write or draw a gel map in your lab workbook showing which samples are to go into each lane of each row. For example this could look like “L-1-2-3-4-5-6-7-8-NC-PC-L”, where L= ladder, NC=negative control, and PC=positive control. This will help you remember which sample is which when you visualise your results.

    Position yourself comfortably for pipetting into the gel

    • Position yourself comfortably in front of your gel, so that you can look straight down into the wells and can manoeuvre your pipette tip directly over the wells. The ideal position of the tip when dispensing is just above or very slightly within the mouth of the well, but it should not be completely inside the well.
    • Place a piece of dark card underneath the gel to help visualise the wells.
    • Prepare yourself to pipette from the left to right (or right to left if left handed) parallel to the wells, stabilising your pipetting hand or pipette with your elbow or other hand, while looking directly down. Avoid pipetting from the front or back.

    Dispense DNA ladder and PCR products carefully into each well

    • Pipette 5 µL of DNA ladder into the first and last wells of each row. The last well may require raising the pipette at a sharp angle.
    • Then pipette 5 µL of each sample PCR in order into each well according to your gel map, making sure that you get each sample into the correct well.

    Samples are most easily pipetted by aiming just to one side of the middle of the well, and then gently pressing down to the first stop of the pipette. It is usually best not to dispense to the second stop unless there is a substantial amount of sample left in the tip after the first stop, as you may blow bubbles into the well. When you are confident with pipetting you can very slightly move the tip when dispensing to more evenly fill the well.

    Once you have finished you are ready to run the electrophoresis gel.

  17. Run your electrophoresis gel

    Run the electrophoresis gel at 50 V for 45 minutes for your amplicons to run half-way down the gel. This distance is ideal for two-row gels.

    If you only have one row you may want to run the gel for longer to get better separation.

    You may also want to run the gel at a higher voltage to get it to run faster. However, this will increase the temperature of the gel and may result in decreased quality of visualisation.

    Be careful not to run your gel for too long or too fast as your PCR products may run off the gel.

    Once your electrophoresis gel has run you can visualise your results.

  18. Visualise your electrophoresis gel

    Wearing gloves (to avoid potential PCR contamination), remove the orange gel tank lid and wipe the inside with a paper towel to remove condensation. Be aware that any touching of the inside of the tank could be a potential PCR contamination risk.

    You can either visualise the gel using the orange lid in a dark room, or by using the Bento Lab Dark Box Viewer.

    To use the Dark Box Viewer, place the box over the gel electrophoresis tank and select the illumination button on the Bento Lab.

    Check that the DNA ladder and your samples have run far enough down the gel to give good enough band separation for your purposes.

    You can then photograph your gel using a smartphone camera. With some phones you may be able to improve the focus manually. Once you have photographed it you can trim and adjust the contrast to better visualise the features of interest.

    It is useful to make a habit of photographing your gel map in your lab workbook just before or after you take a photograph of your gel — this means that you will always be able to know what the samples in each gel by consulting the pair of images.

  19. Interpreting your electrophoresis gel

    To evaluate the electrophoresis gel, you can do the following:

    Examine how the DNA ladders have run

    • The first and last lanes containing DNA ladder should be visible and will have run essentially through the entire top half of the gel. These indicate that the gel has run successfully to the desired extent.
    • Note that some smearing and crowding of bands may occur when using GelGreen DNA stain in combination with high PCR yields of DNA. However, the safety of this stain and its brightness arguably outweighs its tendency to smear for many applications. Alternative DNA stains may smear less.

    Understand the DNA ladder

    • The DNA ladder allows the user to estimate the length of amplified DNA fragments in base pairs by comparison to the adjacent ladders.
    • The 100 bp DNA ladder contains a set of predetermined DNA fragment sizes ranging from 100 to 1000 in 100 bp increments, then 1500, 2000, and 3000.
    • The smallest bands are at the bottom of the gel (they run through the gel more quickly), the larger bands are at the top.

    Check that the negative control is blank

    • The negative control should be blank, indicating no contamination in PCR reagents or during the PCR process.
    • If a faint band is present in the negative control then this may not be a disaster for other successful PCRs if those are bright and of different sizes. In such cases any contamination will be negligible and will only show up in the negative control because there was nothing else to amplify. However, troubleshooting will be required to resolve it.

    Check that the positive control was successful

    • The positive control should have produced a single clear strong band at the expected size as estimated by the DNA ladder, i.e. around 500–1000 bp in this case.
    • If the positive control failed, and all your sample PCRs failed, then that suggests an issue with the PCR.

    Check that your sample PCRs worked well

    • At least some of your sample lanes should contain single bright bands of approximately 500–1000 bp. Single bright bands of the correct size suggest that only one target was amplified per PCR — this is necessary for successful sequencing.
    • Different samples are likely to produce amplicons of different sizes. A gel containing bands of different sizes between 500–1000 bp suggests that these PCRs worked and that they’re not likely to be caused by any single batch-specific PCR contaminant.

    Check for double bands, primer dimers, and PCR artefacts

    • Double or multiple bands suggest more than one species of fungus (lichen or non-lichenised) was amplified. Multiple amplicons cannot be sequenced together using Sanger sequencing and these need to be separated before proceeding with sequencing.
    • Mingle or multiple bands of very low sizes (50–100 bp) often indicate primer dimers — these occur when the primers stick to each other and co-amplify. In some cases you may see a “laddering” effect caused by primer dimers co-amplifying. If this occurs there will be something wrong with your PCR setup conditions, possibly a long set-up time.
    • Smears indicate non-specific amplification, i.e. a range of fragments of DNA being amplified due to issues with the extraction and PCR process.
    • Bands containing a single bright point suggest that you may have stabbed the gel when pipetting. To avoid this always dispense your PCR product into the wells from the right or left, parallel to the wells.

    Check for uneven running of the gel

    Rows of PCR product and ladder DNA do not always run perfectly evenly across the gel, and can run slightly askew or with the middle lanes running faster than those at the edge. This is a limitation of small mini-gel tanks and gels, and it may be more pronounced if you run your gels faster than recommended. Better quality gels may be achieved by running the gel at a lower voltage for a longer amount of time.

    If PCR products produce double bands there are various methods for separating these so you can sequence from them.

    The easiest of these is to stab a band with a pipette tip, and then dipping this into a new PCR mix tube to reamplify as a single amplicon.

  20. Select PCR products for sequencing

    Any PCR product which produced a clean single band of around 500–1000 bp in length will be appropriate for sequencing.

    You can then follow the Bento Lab protocol for sending these PCR products for sequencing here.

Welcome to our community.

Get our monthly biotech tips in your inbox, and we’ll send you a code for $10 off your next order.