If you received a Biotech 101 Kit before May 2021, please use these protocols.

The “Athlete” gene, ACTN3

Reagents

Consumables

Equipment

Abstract

Athletic performance is determined by many factors, including genetics, nutrition, and training. One of the most studied genes regarding athletics is the ACTN3 gene, sometimes referred to as the “athlete gene”.

In our muscles, the two main types of muscle fibres are slow-twitch and fast-twitch fibres. Fast-twitch fibres react quickly and strongly, but they soon tire out. Slow-twitch fibres on the other hand are less powerful but endure longer. The ACTN3 gene controls which type of fibres is more frequent in your skeletal muscles.

What are we testing?

This project explores the genetic variation of the gene ACTN3 r577x. It generates the α-actinin-3 protein, which is present in the skeletal muscle and is essential for its contraction.

Overview

ACTN3 gene variations

You will explore two forms of the ACTN3 gene: The T allele and the C allele.

  • C allele is associated with full power skeletal muscle contraction due to fast-twitching muscles fibres, which means the person could be an excellent sprinter.
  • T allele is correlated with more efficient energy disposure due to slow-twitching muscles fibres, which means the person could have more endurance.

What are the possible results for this experiment?

There are three possible results, since the gene has two variations, and two occurrences of the gene exist – one from each chromosome:

  • Homozygous dominant: Two copies of C allele, which means the person could have better performance as an sprinter.
  • Homozygous recessive: Two copies of T allele, which means the person could have better endurance.
  • Heterozygous: One copy of the C allele, and the T allele. The C allele is dominant over the T allele, so the effect on muscles performance will be similar to the homozygous dominant case.
Protocol

In this project, you will first extract human DNA from saliva. This will take about 20 minutes. After this, you will use PCR to amplify the variations of the ACTN3 gene. This will take about 90 min, but most of it will be waiting time.
Finally, you will visualise the results using Gel Electrophoresis, which will take about 45 min.
At the end of each section, you can continue right away, or store your samples and continue later.


  1. DNA Extraction

    First, obtain the DNA sample. Use the DNA Extraction from saliva protocol. It will take ca 20 min, at the end of which you should have a clean DNA template sample in a PCR tube.

  2. PCR

    In this step, you will use PCR to amplify part of the ACTN3 gene. The sequence of gene fragment we are copying includes the C/T mutation, that relates to the production of the protein α-actinin-3. This C/T mutation is also known as a single nucleotide polymorphism (SNP) with the code rs1815739.

    The experiment uses a method called ARMS PCR. This method uses 4 primers: 2 outer primers that copy the whole fragment, and 2 internal primers, each one specific to either the C or T mutation. This allows amplification of DNA only when the target allele is present in the DNA sample.

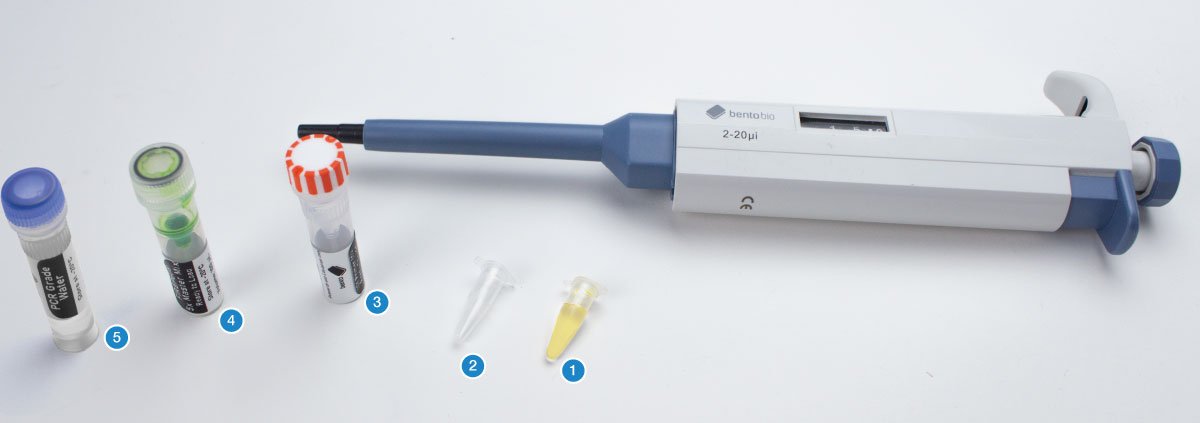
    You will need the DNA template sample (1), an empty PCR tube (2), the primer mix for this project (3), the mastermix (4), and PCR grade water (5). The total final volume of your tube will be 20μL.

    First add the mastermix. Set your micropipette to 4μL.

    Using a fresh pipette tip, transfer 4μL of the master mix into the empty PCR tube. Then discard your tip.

    Next add the primer mix. Set your micropipette to 2μL. Using a fresh pipette tip, transfer 2μL of the primer mix into the PCR tube. Then discard your tip.

    Now add the DNA template. Set your micropipette to 4μl.

    Using a fresh pipette tip, transfer 4μl of the DNA template sample from the sample tube into the PCR tube with the mastermix and primer mix. Then discard your tip.

    Finally add PCR grade water to make the total volume up to 20μl. Set your micropipette to 10μl.

    Using a fresh pipette tip, transfer 10μl of PCR grade water into the PCR tube. Then discard your tip.

    Place your PCR tube in the thermocycler block.

    Set up the thermocycler with the following PCR program:

    • 120 sec at 94°C
    • 35 cycles made of 3 steps
      • 30 sec at 94°C
      • 30 sec at 68°C
      • 30 sec at 72°C
    • 120 sec at 72°C

    If you need help operating the Bento Lab thermocycler, check the manual. You can use the PCR  preset (1), then modify (2) the program to the required settings (3) before running the program (4).

    The program will run for ca 2 hours. When it is finished, you can keep the result in the freezer, or use it right away for gel electrophoresis.

  3. Gel Electrophoresis

    Follow the Gel Electrophoresis Protocol to cast a gel and run it with your PCR result, and a 100bp ladder. This should take about 40 min.

  4. Visualising the Gel

    After the gel run has completed, you can visualise your results.

    Continue to wear gloves as you handle the gel.

    Open the orange lid of the gel box, and wipe off the condensation.  

    Gently pour out the buffer, and dispose of the buffer down a drain.

    Drain disposal of TBE running buffers is a standard waste disposal procedure followed by research labs. If you have questions, get in touch with us.

    Place the gel box onto the Bento Lab transilluminator surface. In order to get best visibility, you should do this in a room as dark as possible.

    Turn Bento Lab on, select the Gel Electrophoresis module, and turn on the Transilluminator light.

    Hold the orange filter lid over the gel to visualise the DNA bands. For documentation, use your mobile phone to take a clear picture of the gel. Rather than holding the lid over the gel, you can hold the lid directly in front of your camera lense.

    If the bands are faint, try to reduce the light in the room, e.g. by closing the curtains and turning off the lights.  You can also carefully take the gel out of the gel box and place it directly onto the transilluminator. Wear gloves when doing this, and be careful not to break the gel.

  5. Analysing your results

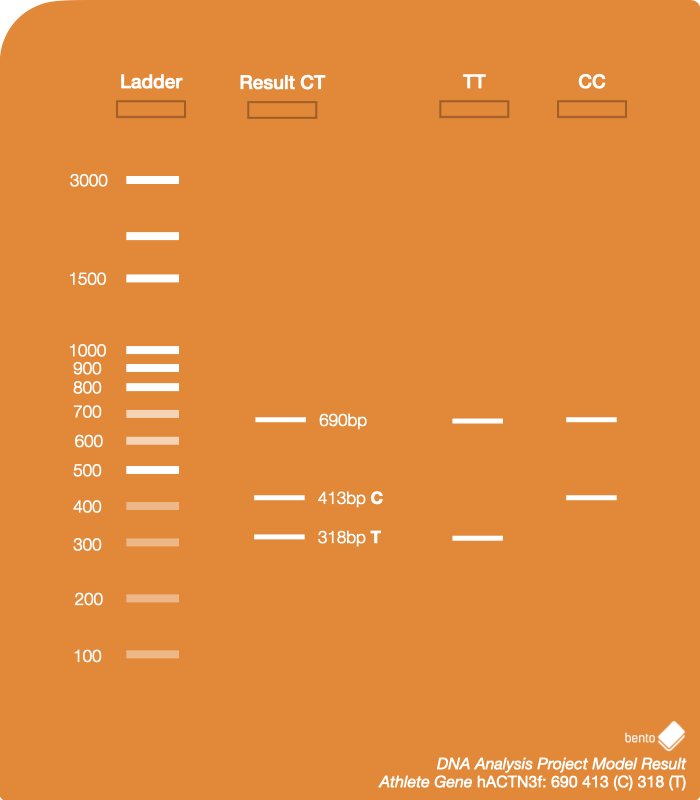
    Compare the picture of your gel to this example result, which has been run with all variations. Your sample should correspond to one of these variations.

    1 – Ladder – 100 bp DNA Ladder

    2 – Result CT – Control (690 bp), C allele (413 bp), T allele (318 bp)
    This result shows a person with a copy of both the T allele and C allele, so someone who is heterozygous. This person has a mixture of muscle types associated with both sprinter and endurance athletes.

    3 – TT – Control (690 bp), T allele (318 bp)
    This result shows a person who has both copies of the T allele, so homozygous recessive. This person has a genetic profile that has been associated to endurance athletes.

    4 – CC – Control (690 bp), C allele (413 bp)
    This result shows a person who has both copies of the C allele, so homozygous dominant. This person has a genetic profile that has been associated to sprinting athletes, so they may have better performing muscles.

    Do not worry if your control band is faint or not visible on the gel. PCR favours shorter amplicons, so it is possible that the majority of amplification occurred for the fragment encoding the C or T allele.

    After you have taken good photos of the gel for your documentation, you can dispose of the gel in your regular trash.

    Disposal of agarose gels is a standard waste disposal procedure followed by research labs. If you have questions, get in touch with us.

Welcome to our community.

Get our monthly biotech tips in your inbox, and we’ll send you a code for $10 off your next order.