Overview
Many birds are sexually monomorphic when young or even when adult, which means that their sex can not be identified based on appearance. Instead, DNA testing can be used based on male and female birds having a different combination of the bird sex chromosomes Z and W.
This collection of bird sexing workflows shows how to:
- Select appropriate primers for your bird species of interest
- Extract DNA from feathers or dried blood spots
- Amplify regions of the bird sex chromosomes Z and W using PCR and an appropriate primer set
- Visualise and interpret your results using agarose gel electrophoresis
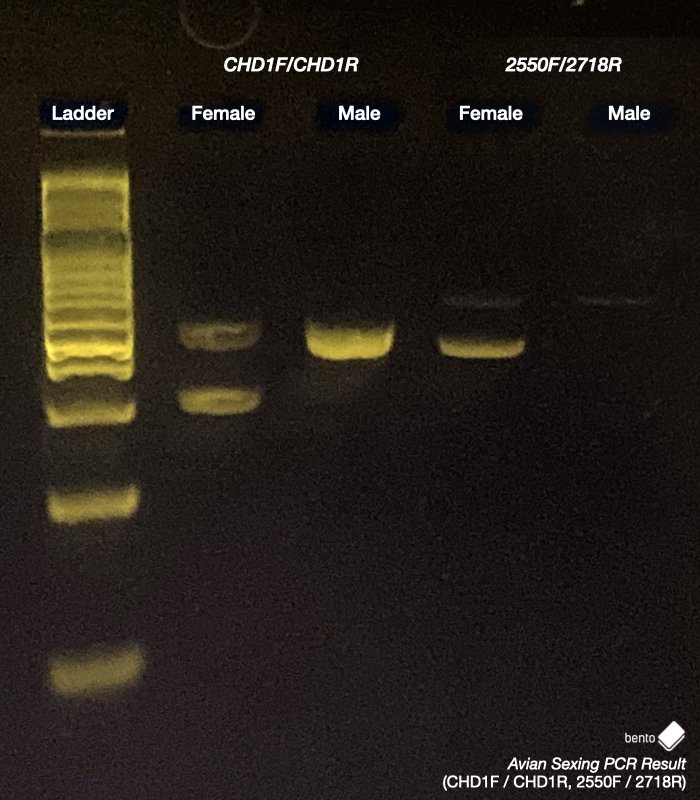
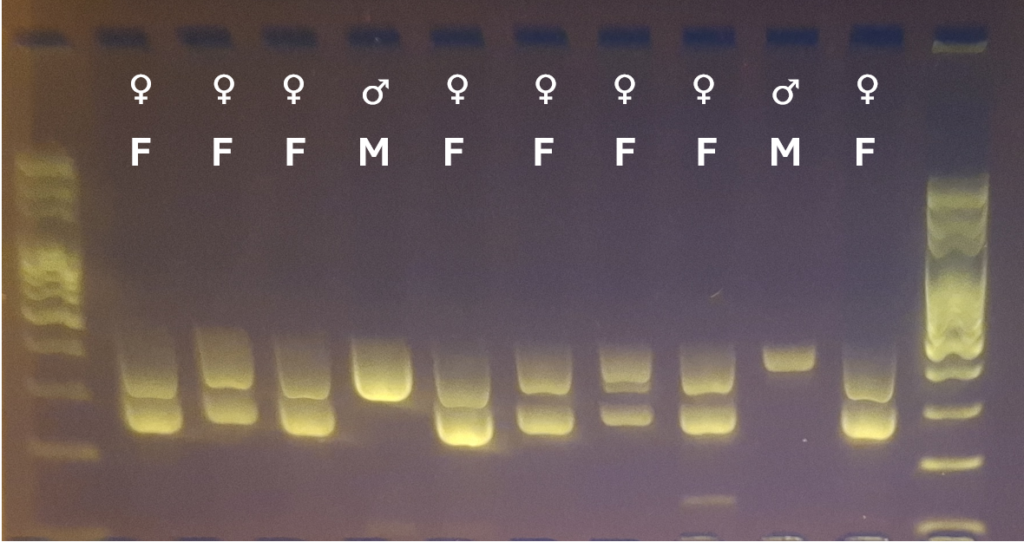
For Primer Set 1 (CHD1F/CHD1R), Primer Set 2 (2550F/2719R), and Primer Set 4 (CHD1LF/CHD1LR), two bands of the appropriate sizes indicate a female bird, and one band indicates a male bird. For Primer Set 3 (P0/P2/3), two or three bands indicate a female bird, and one band indicates a male bird.
Scientific Background – How does it work?
Birds have two sex chromosomes known as Z and W. These are similar to the X and Y sex chromosomes in humans – each inherited from one parent. Male birds have two copies of the Z chromosome (ZZ) and females have one copy of the Z chromosome and one copy of the W chromosome (ZW). This is the opposite of the situation to humans, where most biological females have two copies of the X chromosome (XX) and most biological males have an X and a Y chromosome (XY).
This PCR workflow involves amplifying target regions of the CHD1 (Chromodomain Helicase DNA Binding Protein 1) genes, which are present on the W and Z sex chromosomes of birds as two variants – CHD1-W (on the female-specific W chromosome) and CHD1-Z (present in males and females on the Z chromosome). These genes are homologous (almost identical in structure and function) but contain introns (DNA that is removed by RNA splicing before it is translated into mature RNA) that usually differ in length between sexes within a species and between species.
This difference in length allows both sexes to be determined using a simple assay based on intron length differences. Once DNA has been extracted, regions within the CHD1-Z and CHD1-W (if present) genes can be amplified using the polymerase chain reaction (PCR) and appropriate primers, and the amplified DNA visualised on an electrophoresis gel. If only one band is present, this suggests that only one CHD1 coding variant is present (CHD1-Z), which would be expected for a male with a ZZ chromosome pair. If two bands are present, this suggests that both CHD1-Z and CHD1-W genes are present, which would be expected for a female with a ZW chromosome pair.
The advantage of amplifying both variants (if present) together is that the band produced by the CHD1-Z gene (present in both males and females) should always be visible – it will only be absent if the DNA extraction or PCR fails. It therefore acts as an individual internal positive control for each specimen.
What does the workflow involve?
Before you start, select an appropriate primer set for your bird species using our guide: Choosing a DNA Primer Set for Bird Sexing. A large proportion of bird species should sex satisfactorily using Primer Set 1 (CHD1F/CHD1R) or Primer Set 2 (2550F/2718R), but some bird species may be problematic, so it is worth checking in advance where possible.
Then:
- Sample 2-3 mm of feather tips or a 1×1 mm piece of a dried blood spot into labelled PCR tubes (this is illustrated in the protocols linked below).
- Extract DNA from your birds using the protocols for DNA Extraction From Feathers (HotSHOT) or DNA Extraction From Dried Blood Spots (HotSHOT)
- Set up and run a PCR using the protocol specific for your chosen primer set:
- Visualise your PCR results using agarose gel electrophoresis:
- Cast a 2% agarose electrophoresis gel, load your PCR products and DNA ladder into it, and run it for 45 minutes for a half-gel run (which should be sufficient for band discrimination), or up to 1 hr 30 for a full length gel for maximum band discrimination
- For general guidance on casting a gel, follow the Bento Lab Biotechnology 101 Guide to Gel Electrophoresis
- For a quick-start guide with additional tips for achieving the best results, consult the Bento Lab Manual’s section on Casting A Gel and Running A Gel
- Visualise your results using the Bento Lab transilluminator and Gel Imaging Hood, photograph the results with a smartphone camera, and interpret your result with reference to the specific protocol.
- Cast a 2% agarose electrophoresis gel, load your PCR products and DNA ladder into it, and run it for 45 minutes for a half-gel run (which should be sufficient for band discrimination), or up to 1 hr 30 for a full length gel for maximum band discrimination